




 APPLICATION GUIDE
Removing Resonant Tones & Ringing with CEDAR Blade EQ
Precision Spectral Analysis for Snare, Toms & Multi-Track Drum Recordings
Introduction
Unwanted resonances, ringing, and sustained tonal artefacts are among the most persistent problems in multi-track recordings. Drums—especially snare drums and toms—are notorious for this: after the initial transient fades, a persistent "ring," "ping," or "boing" lingers, cluttering the mix, masking other instruments, and making the kit sound uncontrolled. Traditional FFT-based EQs often fail to reveal exactly where these narrow problem frequencies lie, particularly in the low and mid ranges.
This is where CEDAR Blade EQ excels. Unlike standard FFT analysers, Blade employs a hyper-resolution spectrum analyser capable of resolving down to 0.02 Hz at any frequency, with zoom windows as narrow as 20 Hz. Combined with an IIR EQ offering Q factors up to 100, it lets you identify and surgically remove only the offending resonances—leaving the body, warmth, and character of your drums completely intact.
Understanding Blade’s Key Advantages
- 0.02 Hz resolution - Reveals extremely narrow, discrete resonances invisible to standard analysers
- 20 Hz zoom window - Magnifies any portion of the spectrum to isolate exact peaks
- Q up to 100 - Notch filters affect only the target frequency, leaving neighbouring content untouched
- 8 Parametric filter bands - Target multiple ringing tones simultaneously
- Not FFT-based analysis - No trade-off between time and frequency resolution — accurate at all frequencies
Blade is not just another EQ with a visualiser. Its analyser is comparable to dedicated laboratory-grade signal analysers, making it uniquely suited to surgical EQ work.
Step 1: Preparation & Setup
Before you begin, observe these best practices:
- Process tracks individually or on a drum bus. Resonances are track-specific, and narrow cuts are safest when applied to single sources. You can apply wider cuts on a drum bus, as there may be a build-up of frequencies captured on the multiple microphones. Load Blade directly onto the snare or tom track, and if needed, the drum bus.
- Listen in context and solo. Identify problems in the full mix, then solo the track to analyse and verify.
- Loop a representative section. Choose a section where the ringing is most obvious—typically sustained hits, rolls, or ghost notes where the resonance rings longest.
- Disable other EQs temporarily. Let Blade’s analyser see the unaltered frequency response so peaks are revealed accurately.
Step 2: Using the High-Resolution Analyser to Identify Resonances
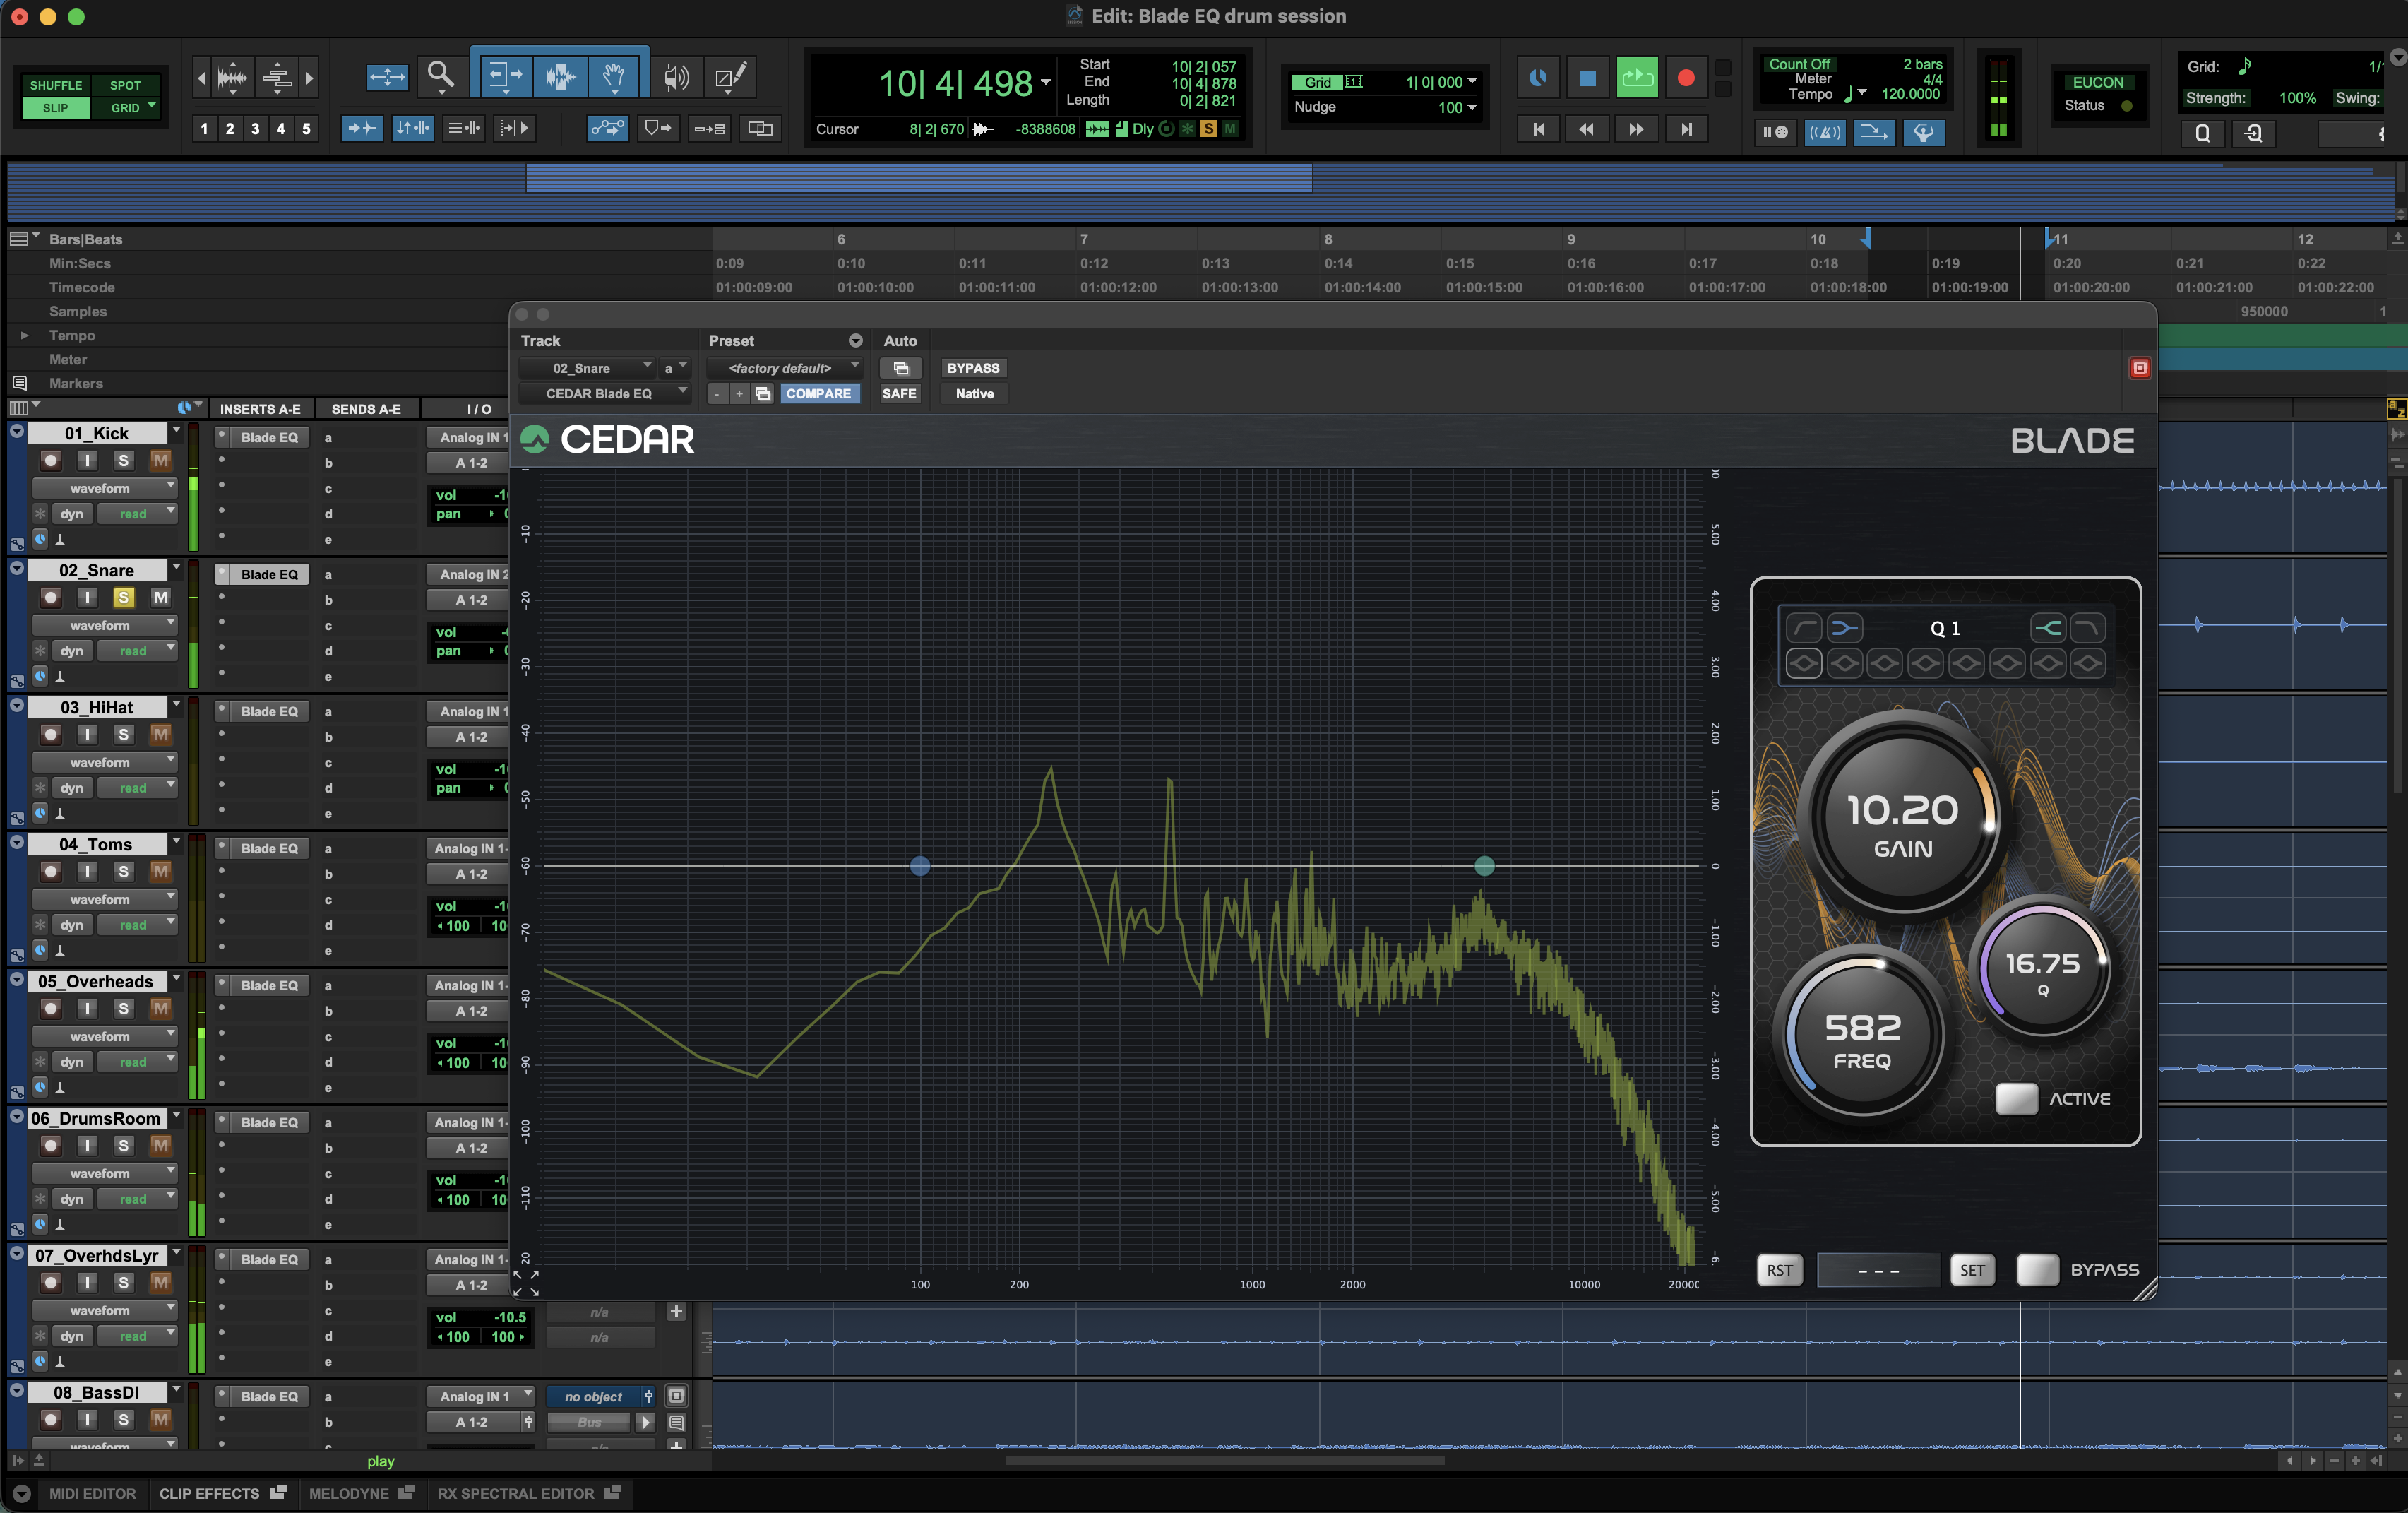
A. Locate the General Region
Play the track and watch the spectrum trace. Drum ringing typically appears as sharp, narrow peaks that persist after the main transient has decayed. Common ranges:
- Snare ring: often between 400 Hz and 1.2 kHz; also check lower-mid "honk" around 200–400 Hz
- Tom ring: near the drum’s fundamental or first overtone—typically 80–300 Hz (floor tom) rising to 200–900 Hz (rack toms).
B. Zoom in for Precision
Click and drag in the frequency axis to zoom tightly around the suspected peak. Unlike FFT displays that blur closely spaced frequencies, Blade will reveal whether that "one ring" is actually multiple tightly spaced resonances—a common discovery on snare drums. Continue zooming until the peak is isolated and its exact centre frequency is clearly readable.
C. Confirm with the "Boost & Sweep" Method
Visual peaks are helpful, but your ears remain the final judge:
- Select an unused EQ band; set it to Bell shape.
- Set Q high (8–20 initially, up to 50 or more later).
- Boost by +6 to +12 dB.
- Slowly sweep the frequency across the peak you identified. When the ringing suddenly becomes loud, harsh, or sustained, you have found the exact resonant frequency.
- Note that frequency. Reset gain to zero.
Why this works with Blade: Because the analyser and EQ are integrated, you can watch the peak align with your filter band in real time. No guessing or cross-referencing between separate windows.
Step 3: Surgical Removal — Snare Drum Ringing
Snare ringing typically comes from two distinct sources: the snare wires themselves, and the drum shell’s own resonance. Blade can distinguish and treat them separately.
Workflow for Snare Tracks
- High-pass first: Insert the HPF around 70–100 Hz to remove kick bleed and sub-rumble—cleaner analysis means easier resonance spotting.
- Find the shell tone: Look for a persistent peak usually 180–350 Hz. This is the snare’s body resonance. Cut –2 to –4 dB, Q 5–10. Do not over-cut—this is where the snare’s warmth lives.
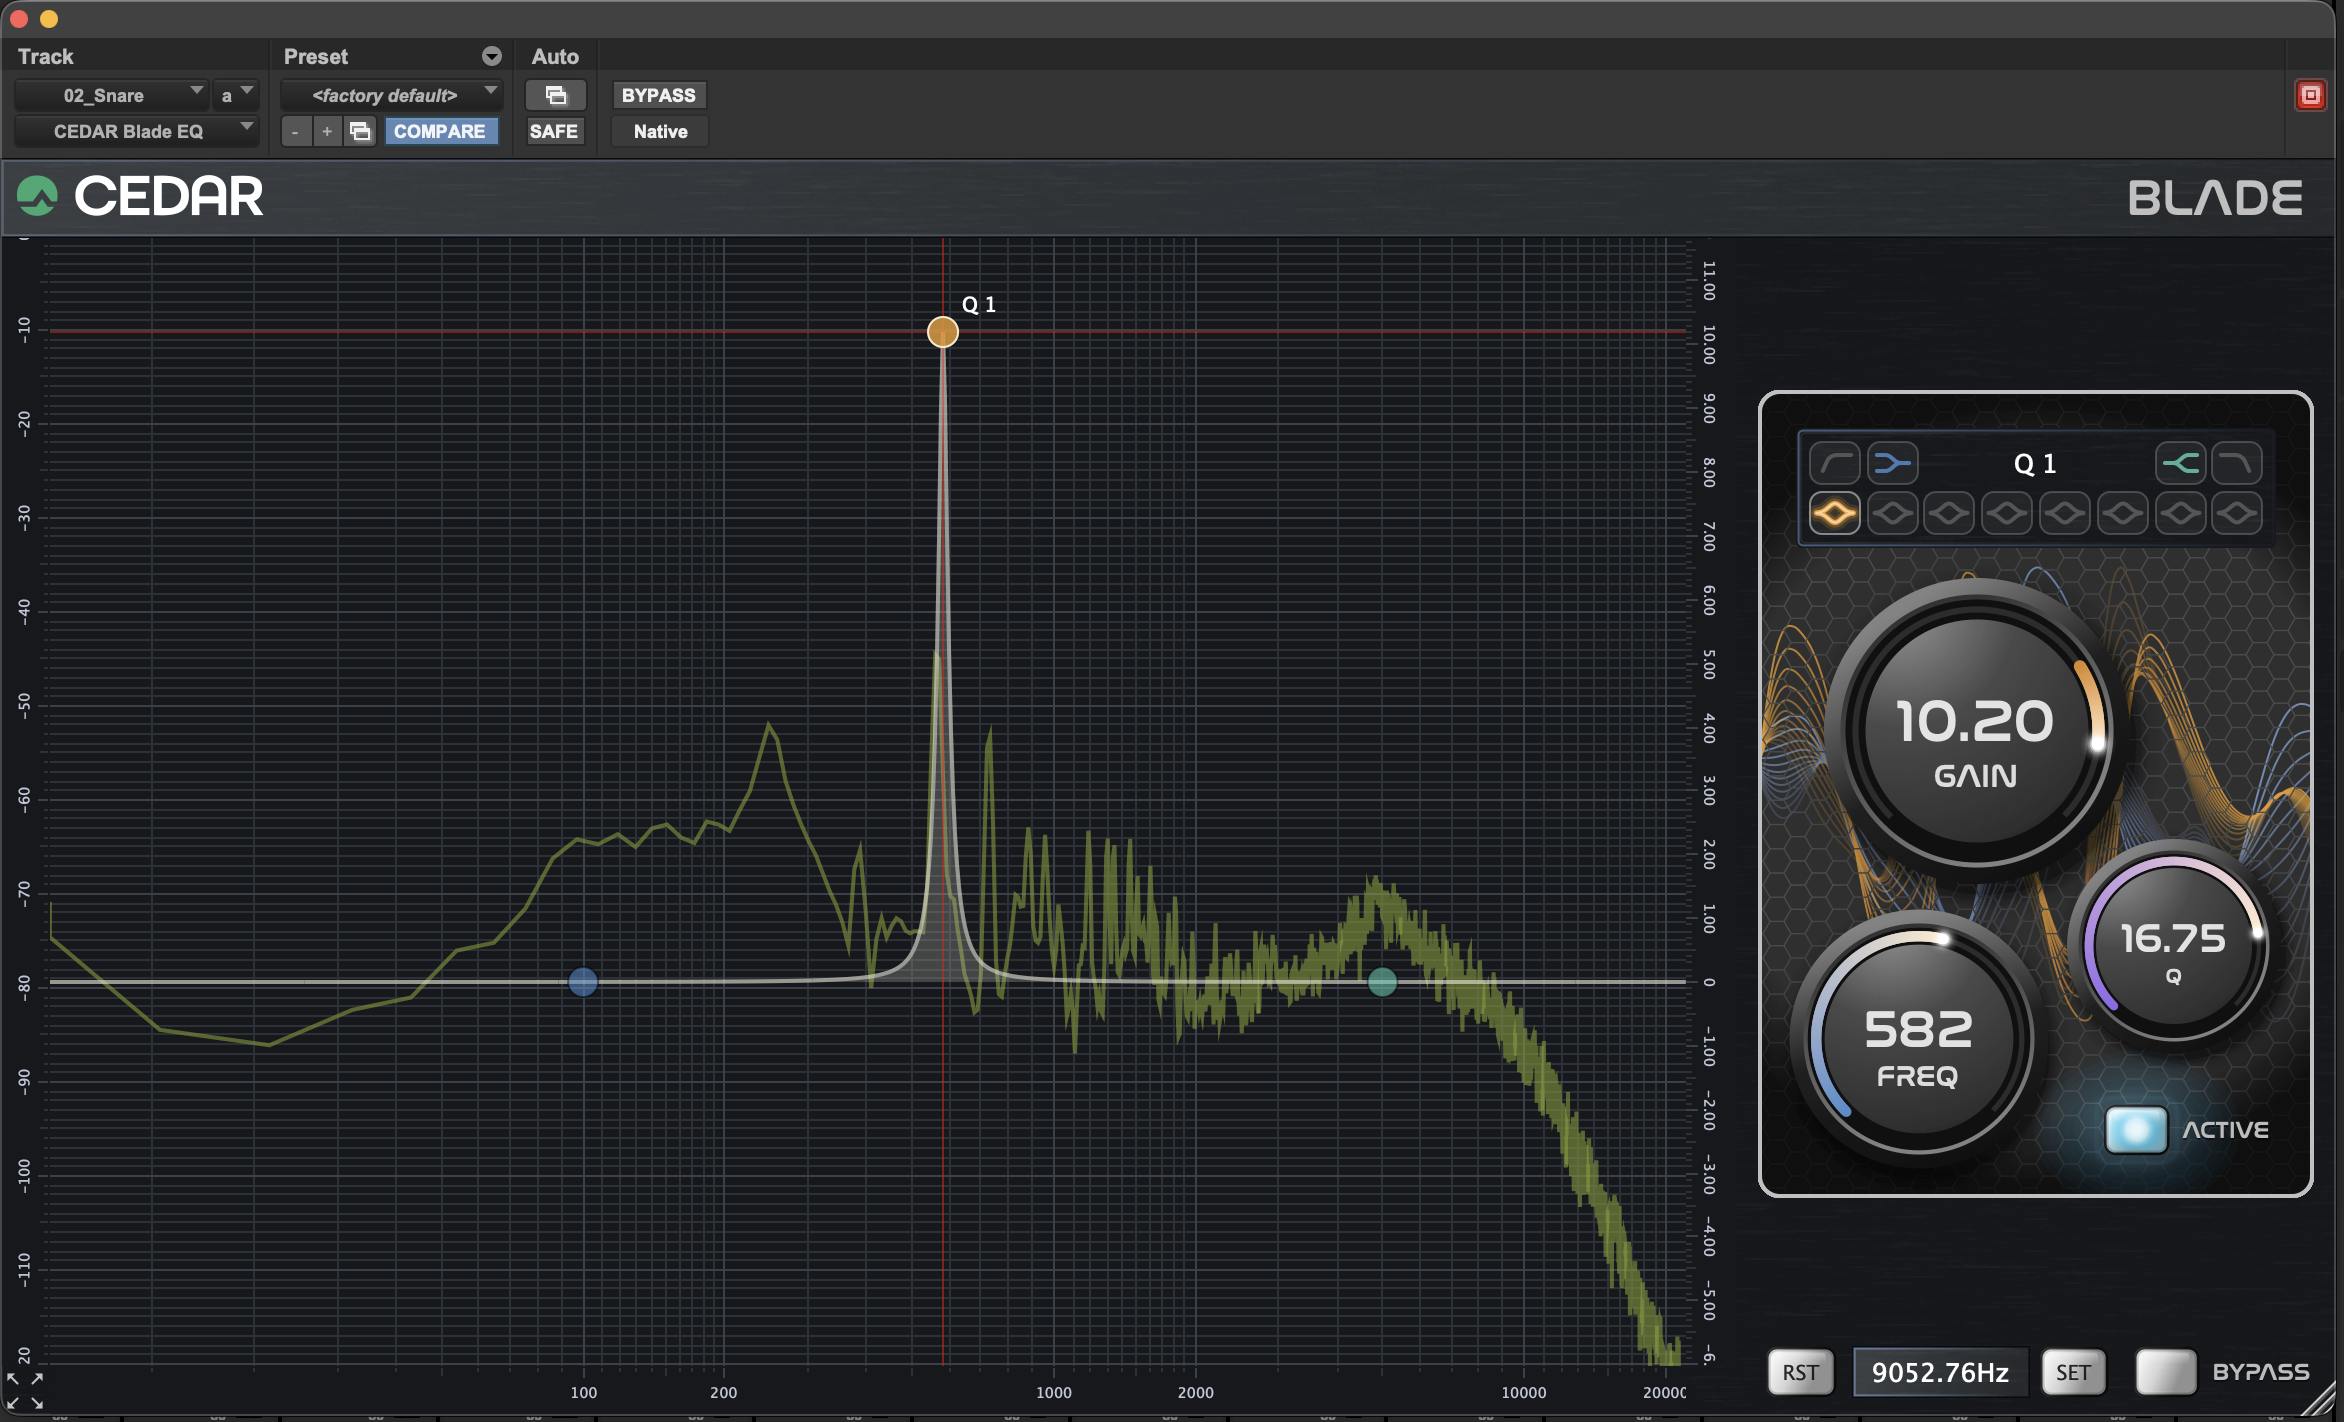
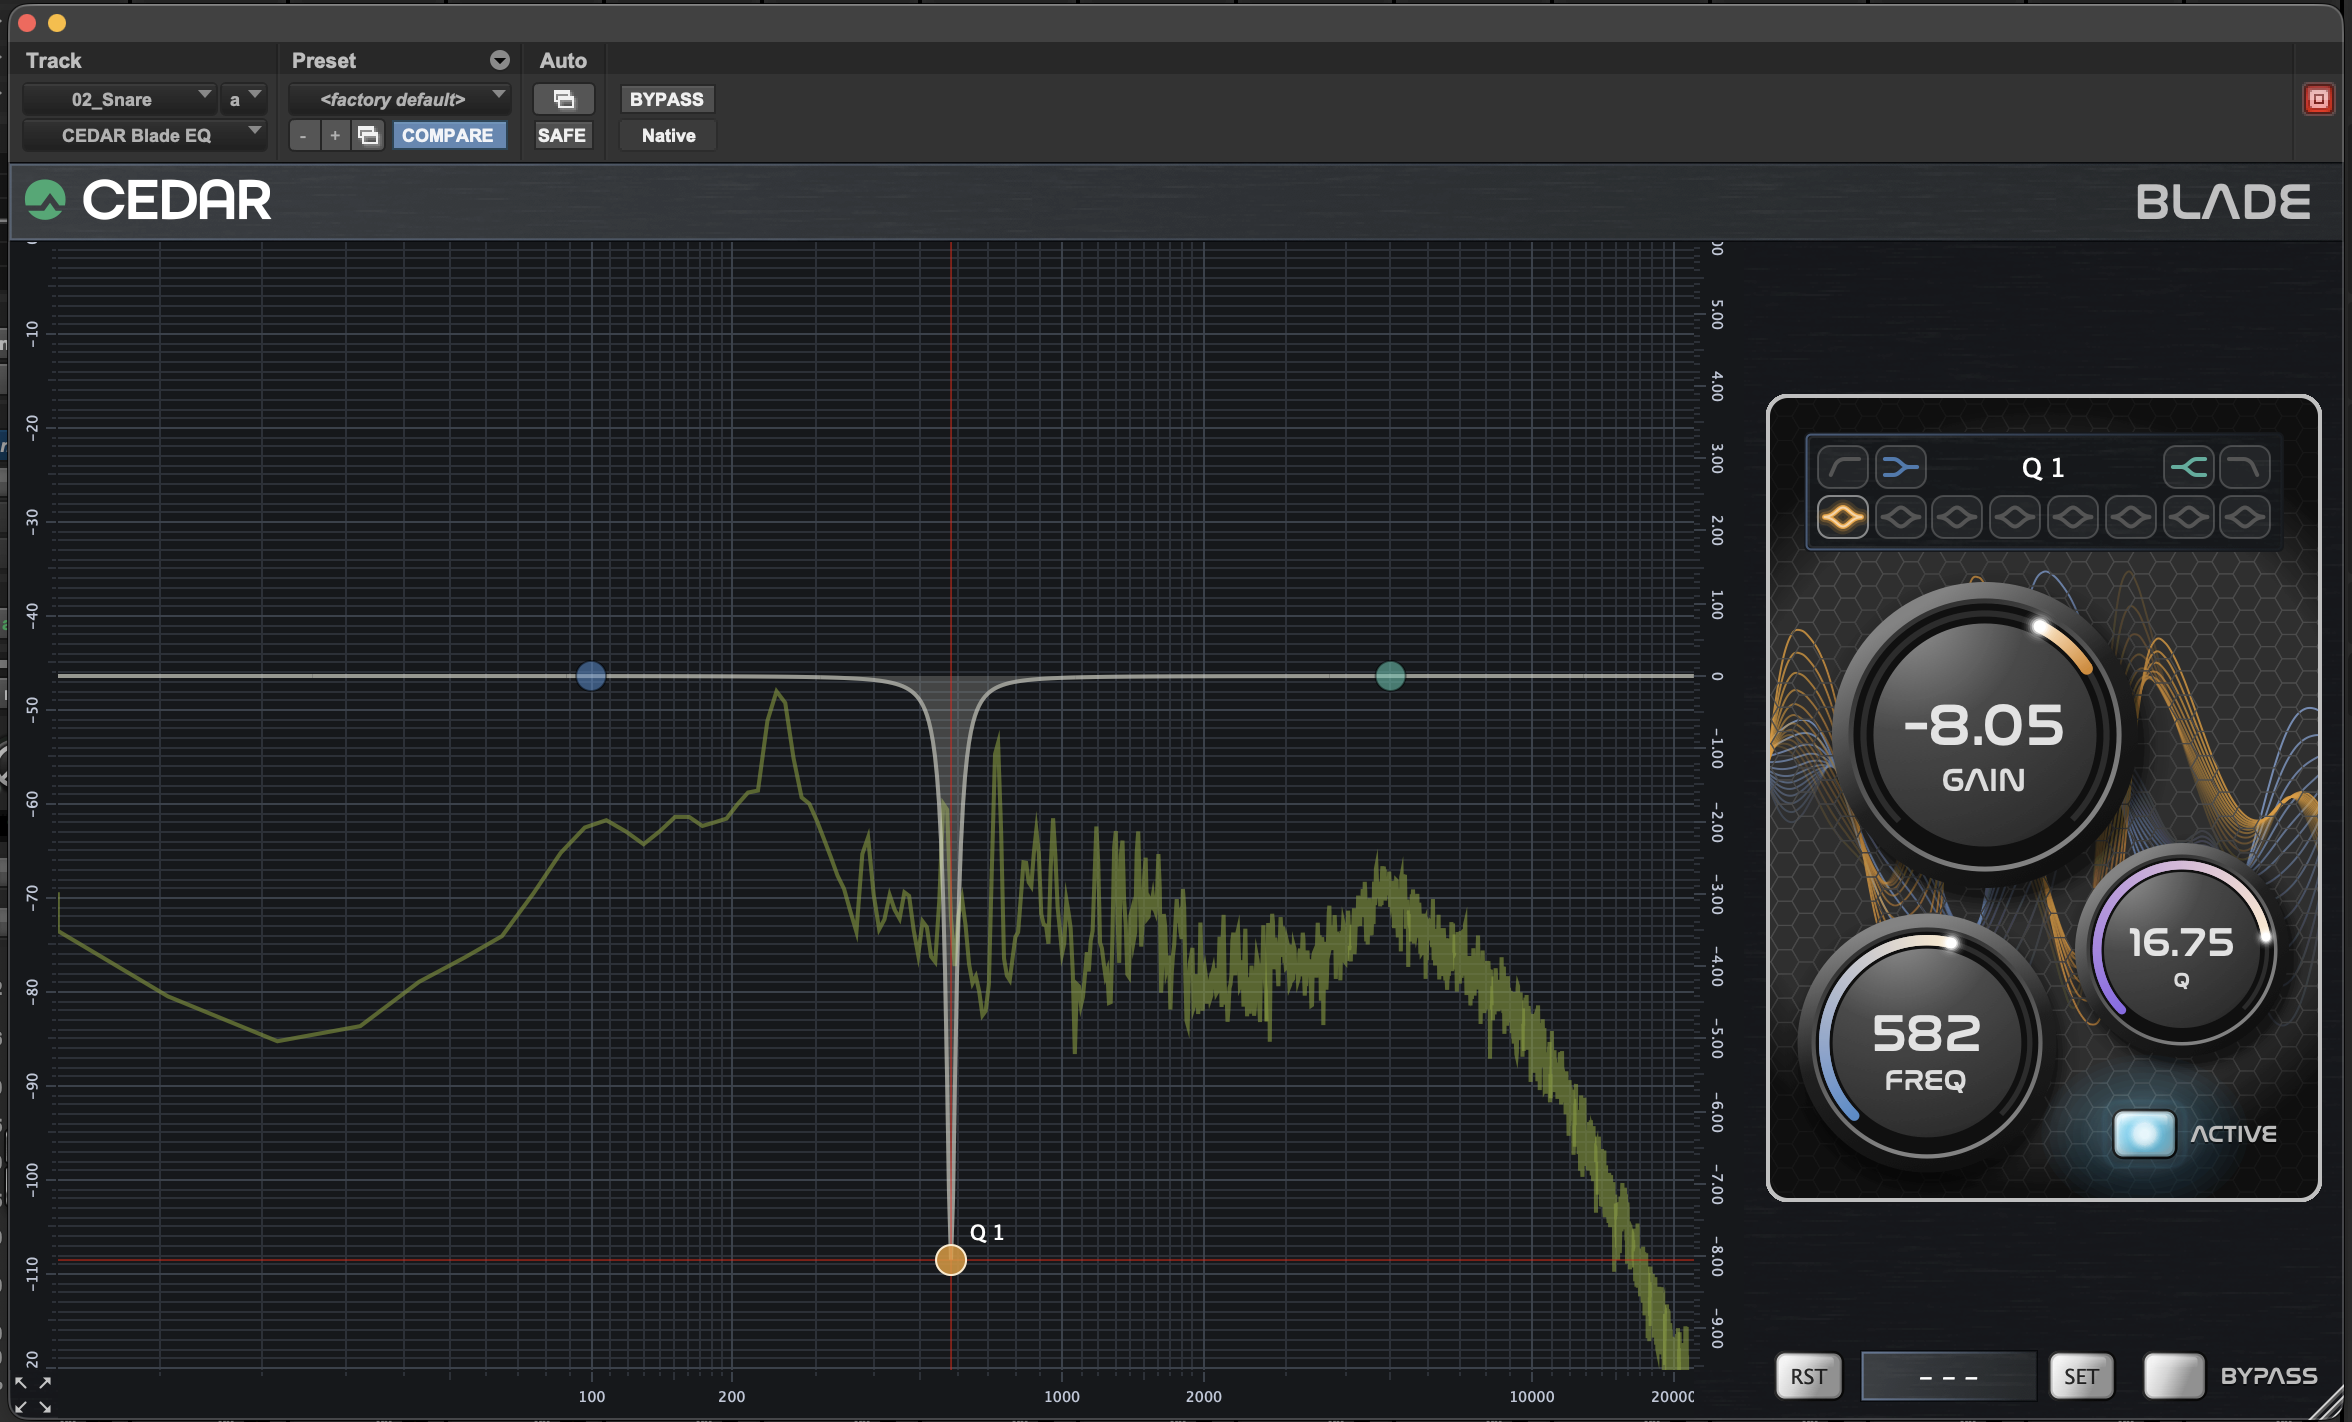
- Notch the snare wire ring: This is the sharp, metallic "ping"—often 600 Hz–1.2 kHz. Use Blade’s analyser to find the exact peak (often 0.02 Hz precision reveals it is not a single frequency but a cluster).
- Apply a Bell or Notch filter, Q 20–80, gain –3 to –8 dB.
- Start subtle: –3 dB is often enough. Toggle the band in/out—if the ringing disappears and the snare still snaps, you’re done. If ring remains, deepen the cut in 1 dB increments.
Check for secondary peaks: Zoom in ±100 Hz around your main cut. You may find one or two smaller resonances nearby. Apply additional narrow, gentle cuts.
Crucial distinction: Blade’s ultra-narrow Q means you can remove the ring without dulling the snare’s crack (which lives at 3–6 kHz). A conventional wide-Q cut would ruin the drum’s character—Blade leaves it untouched.
Step 4: Taming Tom Resonances & Ringing
Toms suffer from a different problem: the entire drum shell sustains at its fundamental pitch, causing a muddy, boomy ring that masks the next hit. Because tom resonances are lower in frequency, FFT analysers are notoriously poor at showing them—this is where Blade’s low-frequency superiority shines.
Workflow for Tom Tracks
1. Identify the fundamental resonance:
- Floor tom: 80–160 Hz
- Rack tom (mid): 120–250 Hz
- High tom: 200–400 Hz
Play a sustained hit and watch Blade’s analyser. You will see a dominant peak that decays slowly. Zoom tightly to reveal its precise centre—often to within 1 Hz or better.
2. Apply the primary notch:
- Bell or Notch filter, Q 10–30, cut –3 to –6 dB.
- Aim to reduce the resonance to a natural decay, not eliminate it.
3. Check for overtone ringing:
Toms often ring at 2× or 3× the fundamental as well. If the drum still sounds "boxy" or metallic, look for peaks at multiples of your first cut. These are typically 400–700 Hz. Apply a second, narrower cut (Q 15–40, –2 to –4 dB).
4. Verify sustain:
Toggle the filter on/off while listening. The hit should still have weight and tone—the only change should be that the drum stops when it should stop, rather than ringing indefinitely.
Step 5: General Multi-Track Resonance Removal
For other instruments or tracks exhibiting persistent tones, hum, or fixed resonances:
- Isolate the problematic section—loop the sustain or decay portion where the tone is most audible.
- Let Blade’s analyser settle and identify the sharp, vertical peaks.
- Zoom progressively tighter until the peak is isolated and its exact frequency is clear.
- Apply a notch filter with Q 30–100, cutting just enough (often –3 to –6 dB) to make the tone inaudible.
- Check harmonics: If a fundamental tone is ringing, check its multiples too—they often ring as well and require smaller, matching cuts.
- Work conservatively: Resonance removal is cumulative. Multiple gentle cuts sound far more natural than one deep, broad cut.
Step 6: Quality Control & Common Pitfalls
✅ Do
- Toggle A/B often to ensure you are improving, not altering, the sound.
- Cut gently first. –3 dB often removes the ring, but don't be afraid to do more if that's what's needed.
- Use the narrowest Q that works. Wider Q removes more content—Blade’s high Q capability is there to be used.
- Revert to full mix frequently. A drum that sounds perfect solo may feel thin in context.
❌ Avoid
- Over-cutting. If the drum sounds hollow or lifeless, you have removed too much body alongside the ring. Reduce the cut or widen the Q slightly.
- Treating the attack. Resonance lives in the decay, not the initial transient. If your cut alters the strike, you have targeted the wrong frequency.
- Applying identical cuts across drums. Each tom and snare has unique tuning and resonances—each needs its own analysis.
Final Thoughts
CEDAR Blade EQ changes the game for resonance removal because it solves the visibility problem first. Where other EQs guess at low-frequency peaks or blur closely spaced resonances, Blade shows you exactly what is ringing and at what precise frequency. The EQ then lets you remove only that frequency, leaving the rest of the track untouched.
The result? Snare drums that crack without ringing out indefinitely. Toms that decay naturally rather than sustaining into the next bar. A multi-track recording that breathes clearly, uncluttered by the unwanted tonal resonances that plague so many mixes.