




 HOW TO
Clean Up Podcast & Audiobook Audio with CEDAR Icons: A Complete Guide
Summary
Introduction
Great audio is the heart of every podcast and audiobook. Background hiss, electrical hum, room noise, clipped peaks, and tiny clicks can ruin an otherwise excellent recording. CEDAR Icons plug-ins bring decades of award-winning audio restoration technology into your DAW with clean, simple interfaces designed to get professional results fast. This guide walks you through which plug-ins to use, the ideal processing order, and pro tips to keep your speech sounding natural.
Meet the CEDAR Icons Plug-ins for Spoken Word
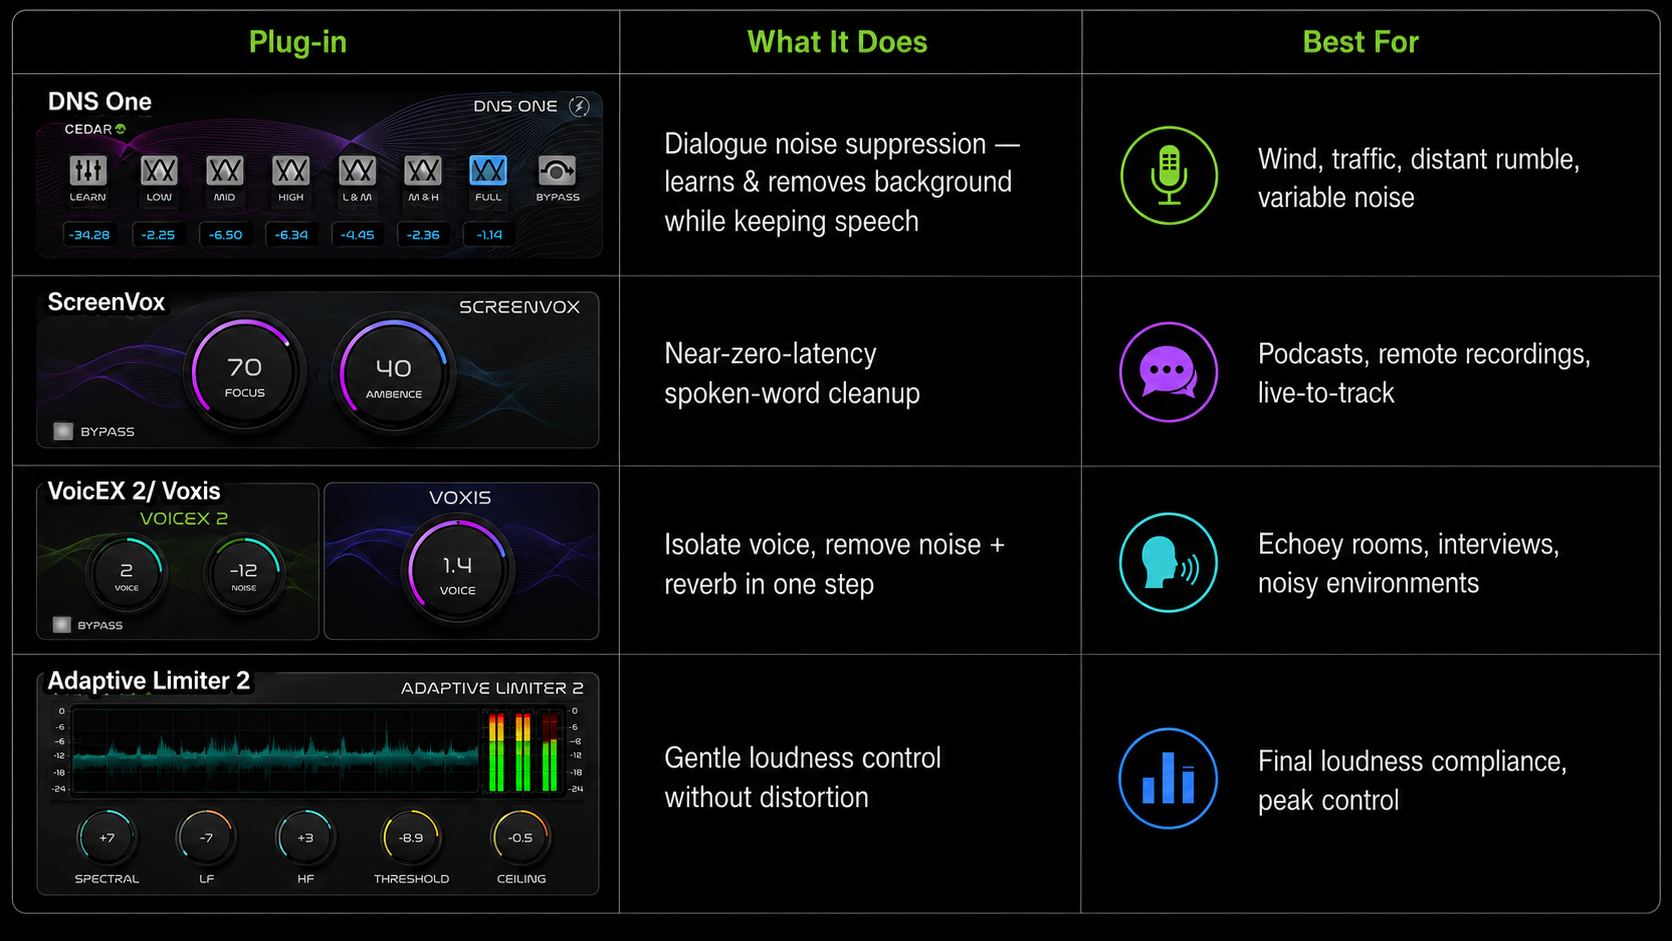
CEDAR Icons splits into two families: Production (post-production, offline cleanup) and Live/Dialogue (real-time voice cleanup). Here are the ones you’ll reach for most often:
Restoration & Cleanup (Production Series)
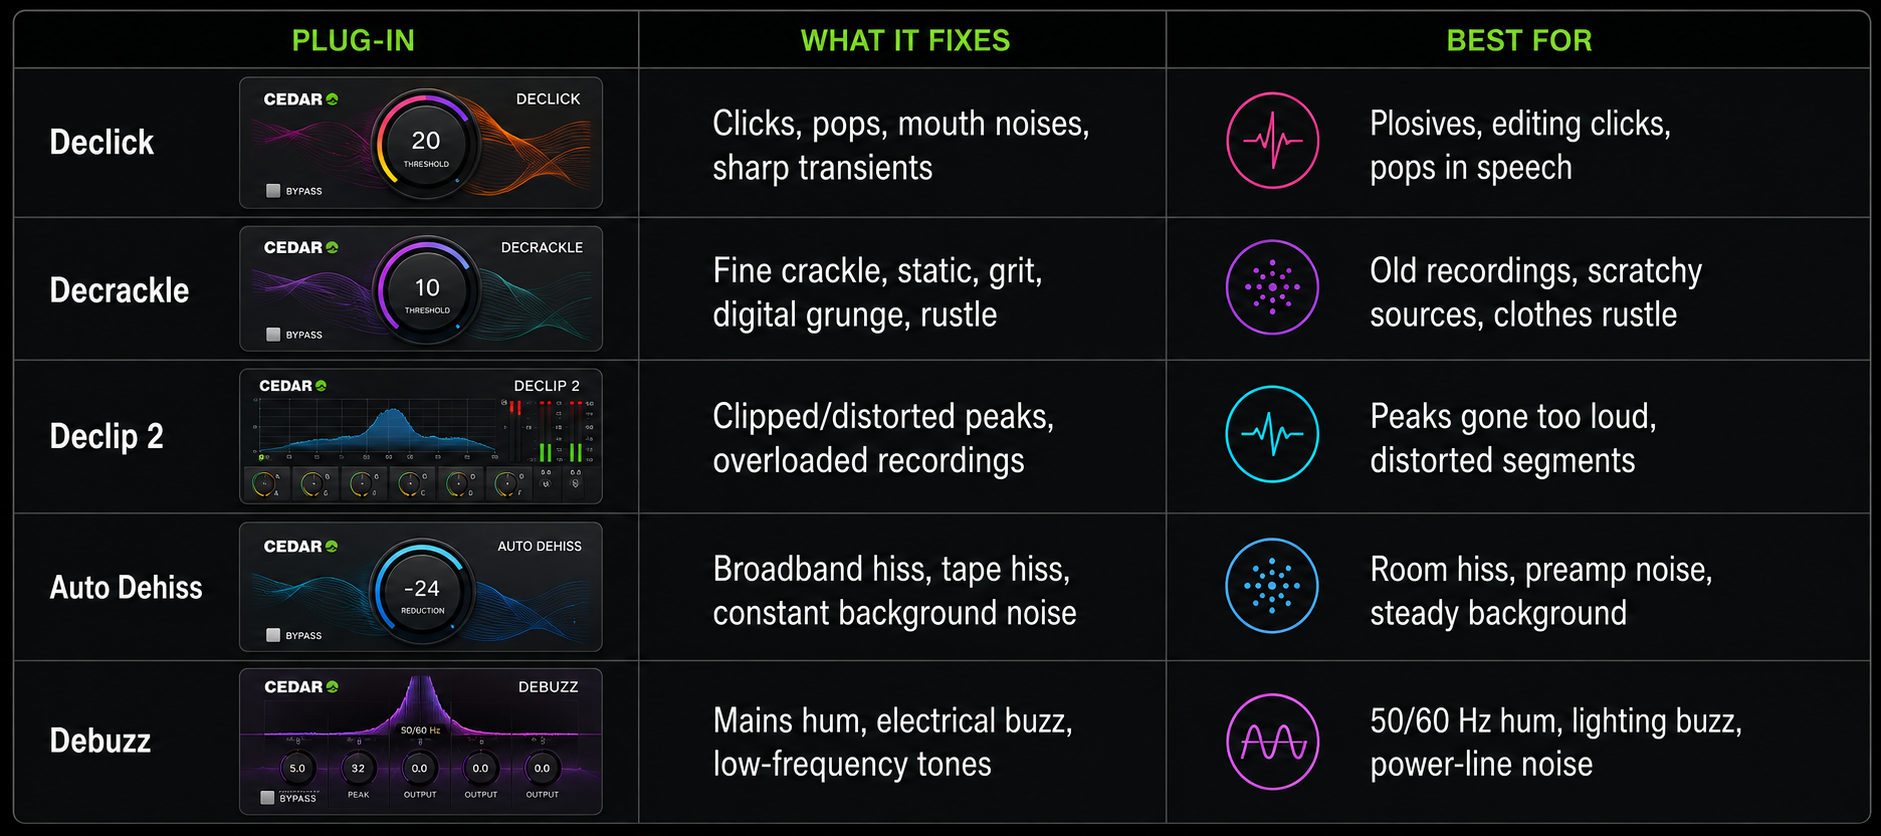
Voice & Dialogue
The Golden Rule: Processing Order
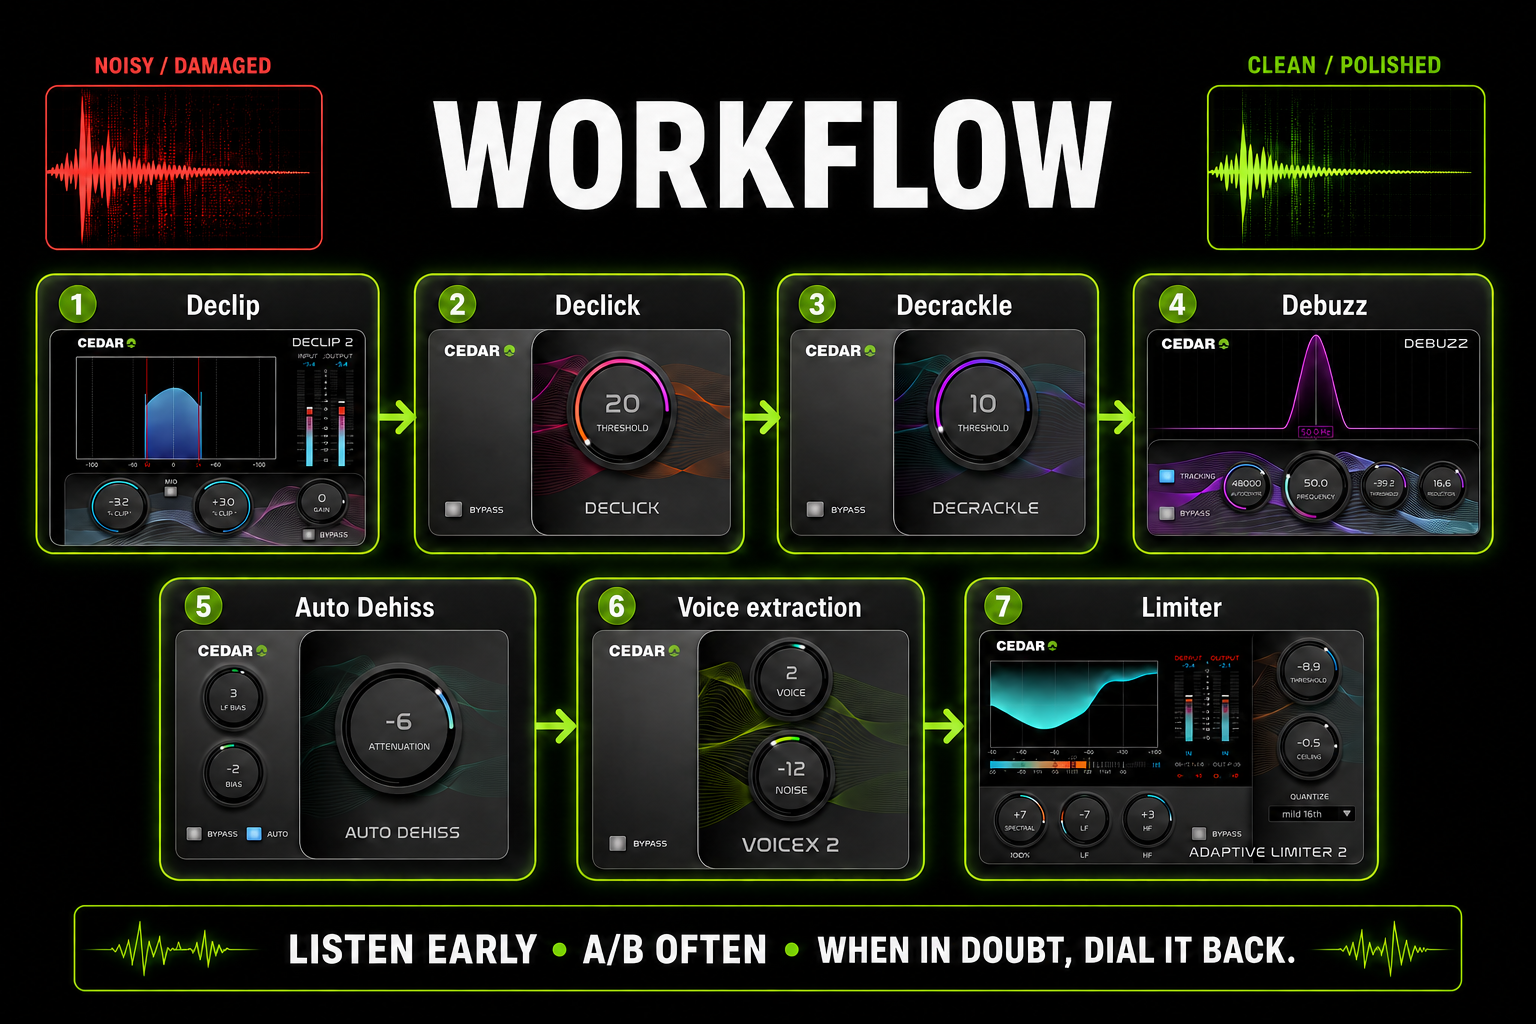
Order matters. Always apply the most destructive corrections first, then move to subtler noise reduction. This is the proven workflow:
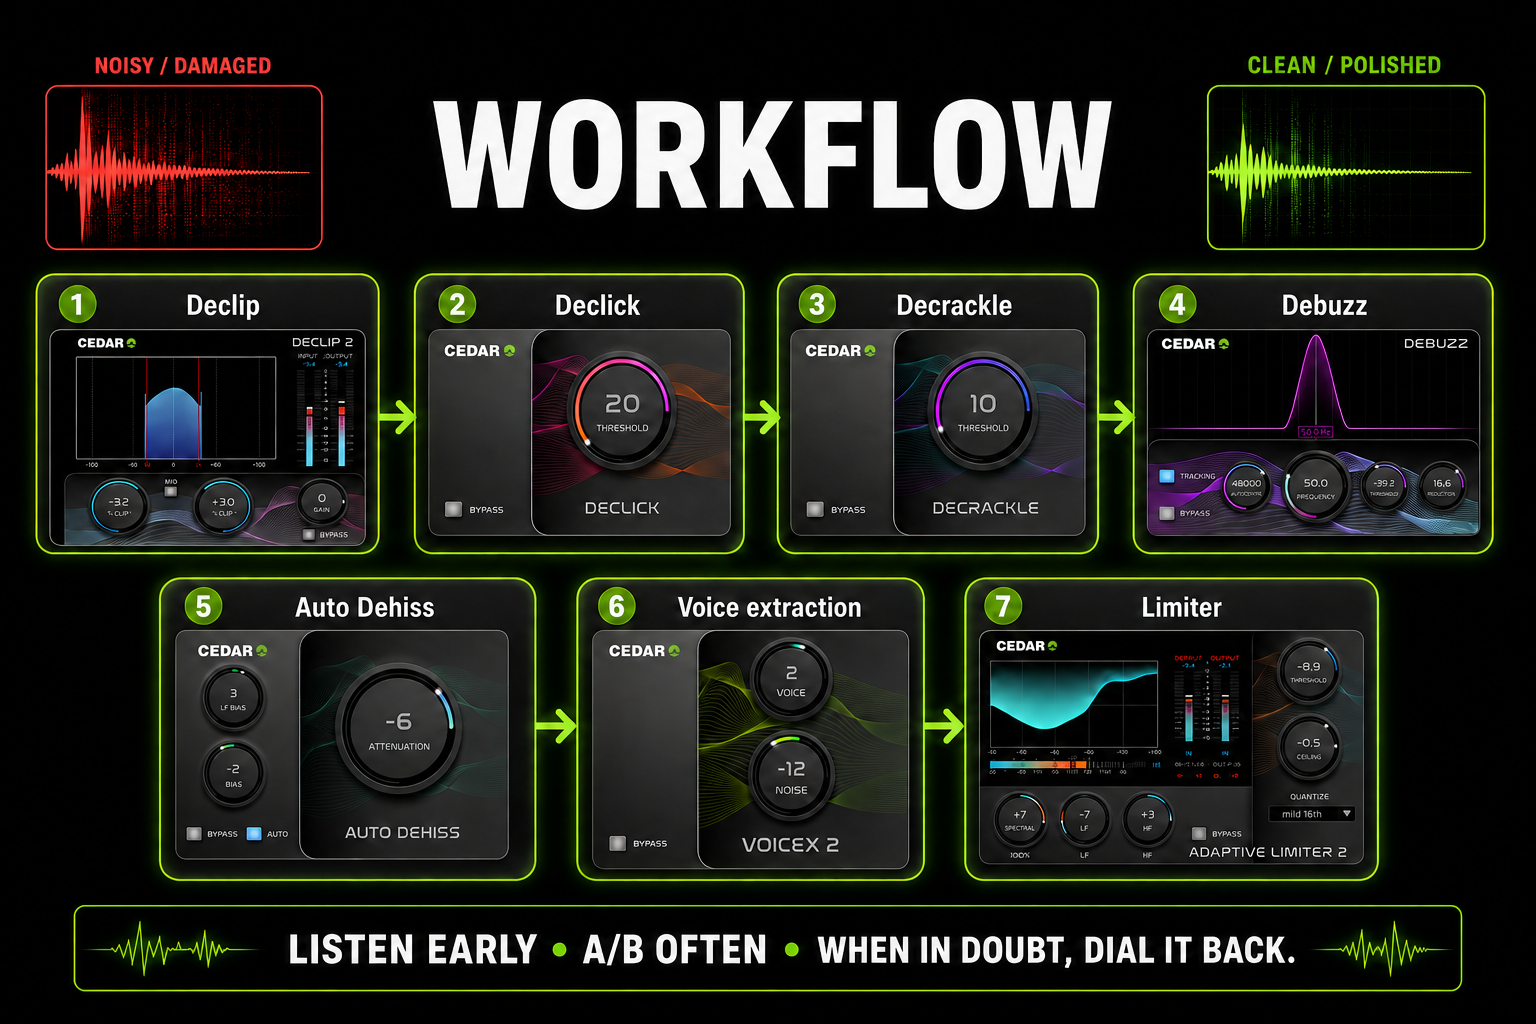
Step-by-Step Workflow
1. Repair Clipped Peaks — Declip 2
If your recording was recorded too hot and the tops of the waveforms are flattened, start here. Declip 2 reconstructs what the waveform should have been, removing harsh distortion.
- Auto mode works great for speech — it tracks varying clipping levels automatically.
- Start with the single knob around 30–50% and A/B. You’ll hear harsh edges soften while clarity stays intact.
- Tip: If the clipping is severe, accept that perfection may not be possible — lighter settings usually sound better than over-processing.
2. Remove Clicks & Pops — Declick
Clicks come from plosives ("p", "b"), saliva noises, edit points, or digital glitches. CEDAR Declick uses just one knob.
- Set it just high enough to remove obvious clicks without softening consonants like "t", "k", or "p".
- Sweet spot for speech: 20–40%. If you hear words losing punch, back it off — you’re removing natural transients.
- Pro trick: If only a few loud clicks remain, process the whole track gently, then fix the rest manually in your DAW’s spectral editor.
3. Clean Up Fine Crackle — Decrackle
If your audio has a gritty, grainy texture or constant tiny static pops:
- Decrackle splits the signal — one path for crackle, one for voice — then recombines them transparently.
- Start low: 20–35%. Crackle gone but voice still crisp? Perfect.
- Warning: Over-dialing removes natural breath sounds and makes speech sound "processed". Less is more.
4. Eliminate Hum & Buzz — Debuzz
Mains hum (50 Hz in UK/EU, 60 Hz in US), lighting buzz, and ground-loop noise.
- Debuzz tracks drifting tones and removes harmonics without the hollow, distant sound that notch filters introduce.
- It usually identifies hum automatically — no tuning required.
- If you know the source frequency, set it manually; otherwise, leave it on Auto.
- Ideal for: USB interface buzz, laptop power-supply noise, poorly isolated recordings.
5. Reduce Constant Background Hiss — Auto Dehiss
Tape hiss, preamp noise, or steady room noise. Unlike traditional dehissers that can make speech sound underwater or "twittery", Auto Dehiss works transparently.
- Auto mode analyses the noise floor automatically — just engage and listen.
- If you hear the voice thinning out, switch to Manual and reduce the depth slightly.
- Pro tip: Capture a noise print from silence between sentences if available — Auto Dehiss will refine its detection.
- Leave a little hiss behind — total silence between words sounds unnatural and draws attention to processing.
If you still hear traffic, wind, distant air conditioning, or room reverb after the above steps:
DNS One — The broadcast standard
- Learn a noise profile from a quiet section, then adjust the Suppress knob.
- It preserves consonants remarkably well — "s", "f", "th" stay crisp while background falls away.
- Use gentle settings (30–50%) on speech; aggressive settings create artefacts.
ScreenVox — Purpose-built for spoken word
- Near-zero latency, great for podcasting and post-production.
- One or two knobs — dial in noise reduction without affecting voice quality.
- Excellent for interviews recorded in different rooms or remotely.
plink,VoicEX 2 / Voxis— All-in-one voice extractor
- Two knobs only: Voice and Noise.
- Removes noise and reduces room echo/reverb simultaneously.
- Perfect for: Zoom/remote interviews, recordings in tiled/hard rooms, any speech with obvious echo.
- Tip: Don’t over-reduce reverb — a little room ambience keeps the speaker human.
7. Final Loudness & Peak Control — Adaptive Limiter 2
Once audio is clean, bring it to standard loudness:
- Podcasts: -16 LUFS integrated
- Audiobooks: typically -19 LUFS (check your platform’s specs — ACX, Audible, etc.)
- Adaptive Limiter 2 uses spectral limiting — it preserves clarity better than conventional limiters.
- Set ceiling to -1.0 dBTP and keep gain conservative — watch for pumping or dullness.
Essential Tips & Tricks
✅ Work on a Copy — Keep Your Original
Never process your only file. Keep the raw recording on a muted reference track so you can A/B constantly. The goal is better, not different.
✅ Less Is Always More
CEDAR algorithms are powerful — you rarely need to turn knobs past 50%. If you think 50% is good, try 35% and listen again. Natural speech texture is easy to destroy.
✅ Match Processing Across Segments
Audiobooks and long recordings get re-recorded in sections. Apply identical plug-in settings across all files so the voice doesn’t change character between chapters.
✅ Order Is Non-Negotiable
Impulsive problems (clipping, clicks) must be fixed before noise reduction. If you hiss-reduce first, you’ll exaggerate clicks and make them harder to remove.
✅ Silence Is Relative
Leave a tiny amount of natural noise floor. Complete silence between words draws attention to processing and sounds artificial. The goal is transparent cleanup, not clinical perfection.
✅ Use ScreenVox, Voxis or VoicEX 2 for Interviews
If you have multiple speakers in different environments, apply an instance per track with slightly different settings. One-size-fits-all noise reduction rarely works across multiple speakers.
✅ Test on Multiple Systems
Check your results on headphones, laptop speakers, and car speakers. Clean audio should sound clear everywhere — if it sounds thin or hollow on small speakers, you over-processed.
✅ Save Your Chains
Once you find settings that work for your voice or typical guest recordings, save your preset chain. Next episode: load, tweak, done in minutes.
✅ Use the 14-Day Trials
All CEDAR Icons plug-ins offer free 14-day trials. Test before you buy — hear how they handle your specific voice and room
Quick Reference Cheat Sheet
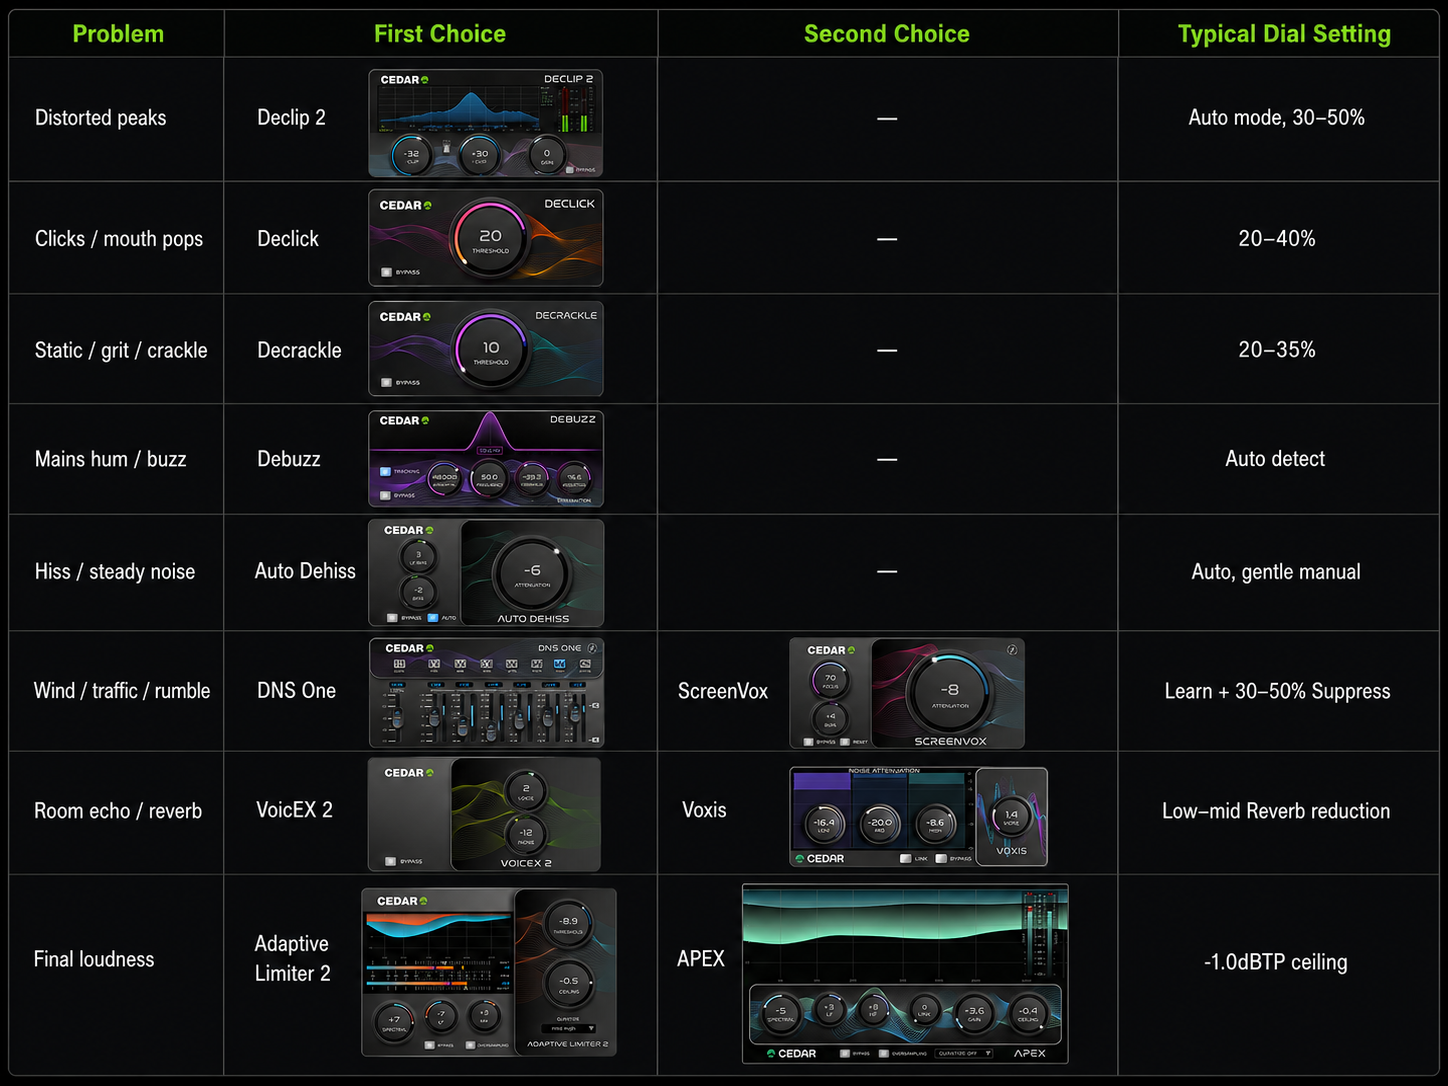
Final Thoughts
CEDAR Icons aren’t magic — but they’re close. The secret to great-sounding podcasts and audiobooks isn’t turning every knob to maximum, it’s applying the right tool in the right order with a light touch.
The philosophy is this... remove what distracts, preserve what communicates. When processing is transparent and the listener hears the speaker, not the cleanup, you’ve done it perfectly.
Workflow recap:
Head of Sales
CEDAR Audio Ltd
26 Aug 2026