




 HOW TO
Vocal EQ & Resonance Removal with CEDAR Blade EQ
Every vocal recording carries subtle tonal buildups — room modes, microphone proximity peaks, standing waves, or nasal/honky formants — that leave certain frequencies ringing too loudly. This article offers a process to eliminate resonances using CEDAR Blade EQ
Introduction
Every vocal recording carries subtle tonal buildups — room modes, microphone proximity peaks, standing waves, or nasal/honky formants — that leave certain frequencies ringing too loudly. These resonant tonesmake vocals sound boxy, muddy, nasal, harsh, or "boomy" in spots. Traditional EQs often blur these narrow peaks together, making precise correction guesswork. CEDAR Blade EQ changes that: its hyper-resolution analyser reveals resonances with unmatched clarity, and its ultra-sharp filters let you remove them without damaging the vocal's natural tone.
What Makes Blade EQ Different?
Blade EQ combines two powerful tools in one interface:
- Hyper-Resolution Spectrum Analyser — Unlike standard FFT analysers, Blade achieves 0.02 Hz resolutionand can zoom down to a 20 Hz window at any frequency. Narrow resonances that appear as one broad hump in other EQs resolve as distinct, sharp peaks here.
- Surgical IIR EQ — 8 parametric bell filters, plus high-pass, low-pass, and two shelves. Q values reach over 100, letting you cut a problem frequency while leaving every surrounding hertz completely untouched.
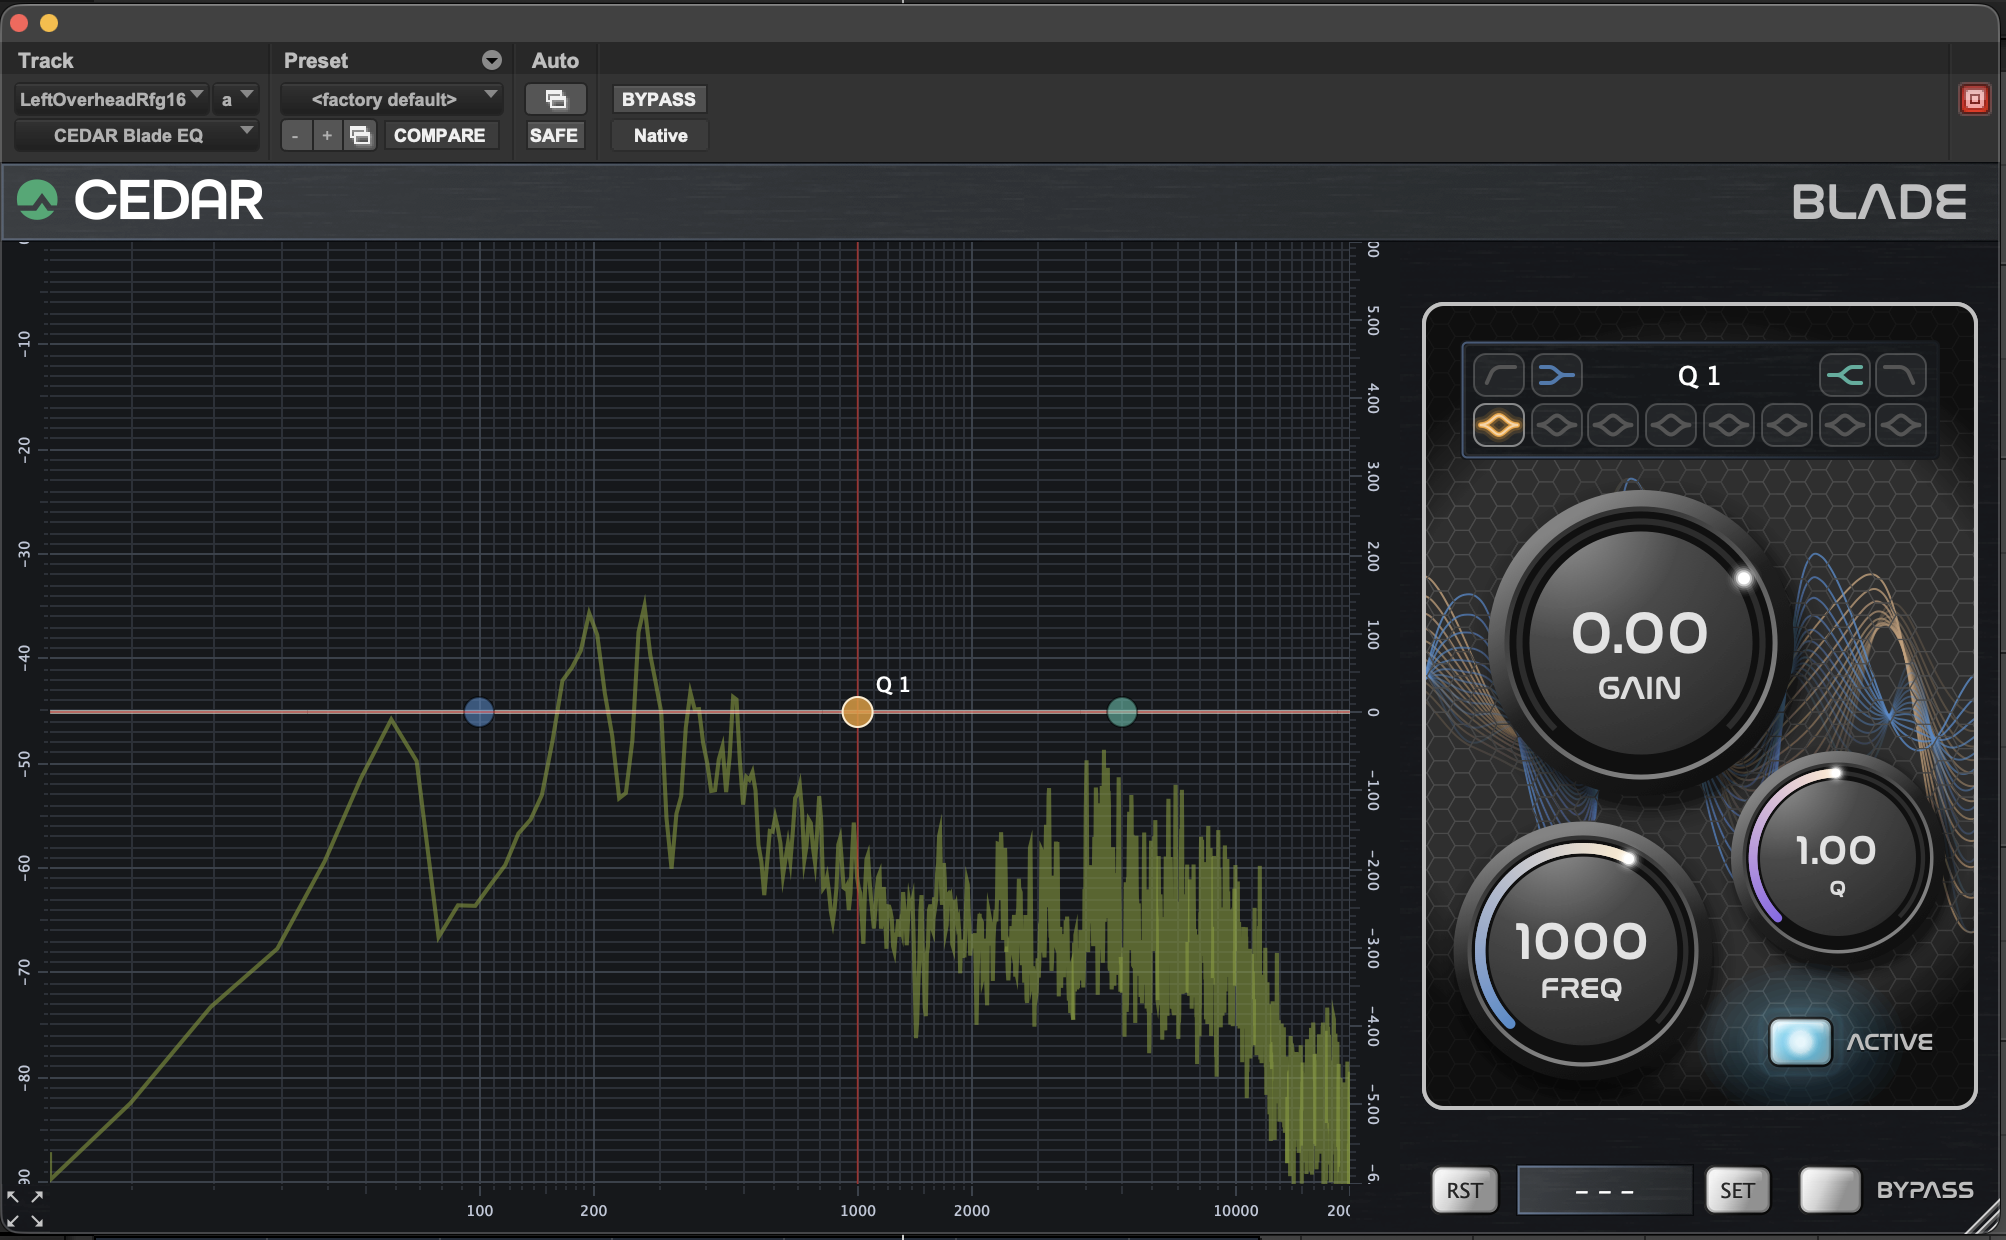
You see exactly where the problem lives.
Step 1: Understand What You're Hearing
Resonant tones appear in predictable ranges:
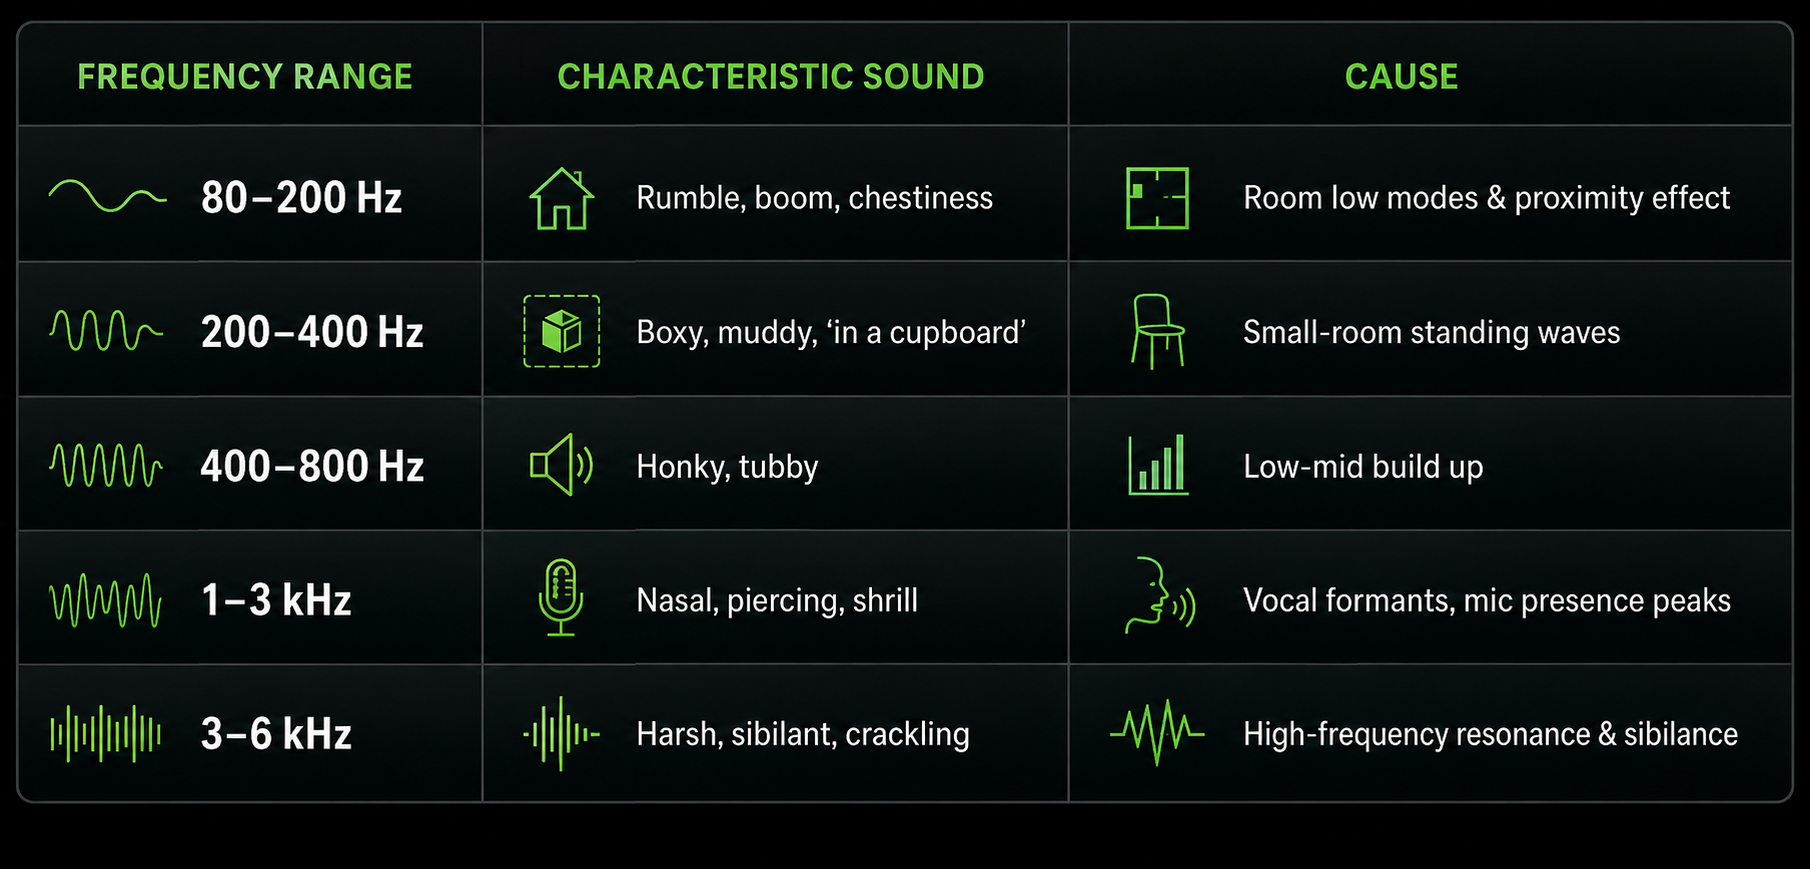
You may hear 1–3 clear problem resonances per vocal recording. Rarely more.
Step 2: Identify Resonances — Two Methods
Method A: Visual Detection (Blade's Superpower)
- Solo the vocal track and loop the most revealing phrase — typically the loudest, fullest sustained note or vowel.
- Watch the spectrum display in Blade. Look for thin, sharp spikes rising above the surrounding curve. Broad humps are timbre; narrow, needle-like peaks are resonance.
- Zoom in on any suspect region by dragging the frequency axis. Blade will resolve peaks that traditional analysers completely hide.
- Click directly on a peak to place a filter band exactly there.
Method B: The Sweep Technique (Confirm by Ear)
- Activate a parametric bell filter, set Q = 6–12, Gain = +6 to +12 dB.
- Slowly sweep the frequency knob across the vocal range (200 Hz → 5 kHz).
- When the resonance hits, the sound will jump forward and ring loudly. That is your target frequency.
- Reset Gain to 0 dB — the frequency is locked.
Pro Tip: Use the visual display to narrow the search, then sweep by ear to confirm. Together they eliminate guesswork.
Step 3: Remove Resonances — The Surgical Cut
Once you have identified a resonance at frequency F Hz:
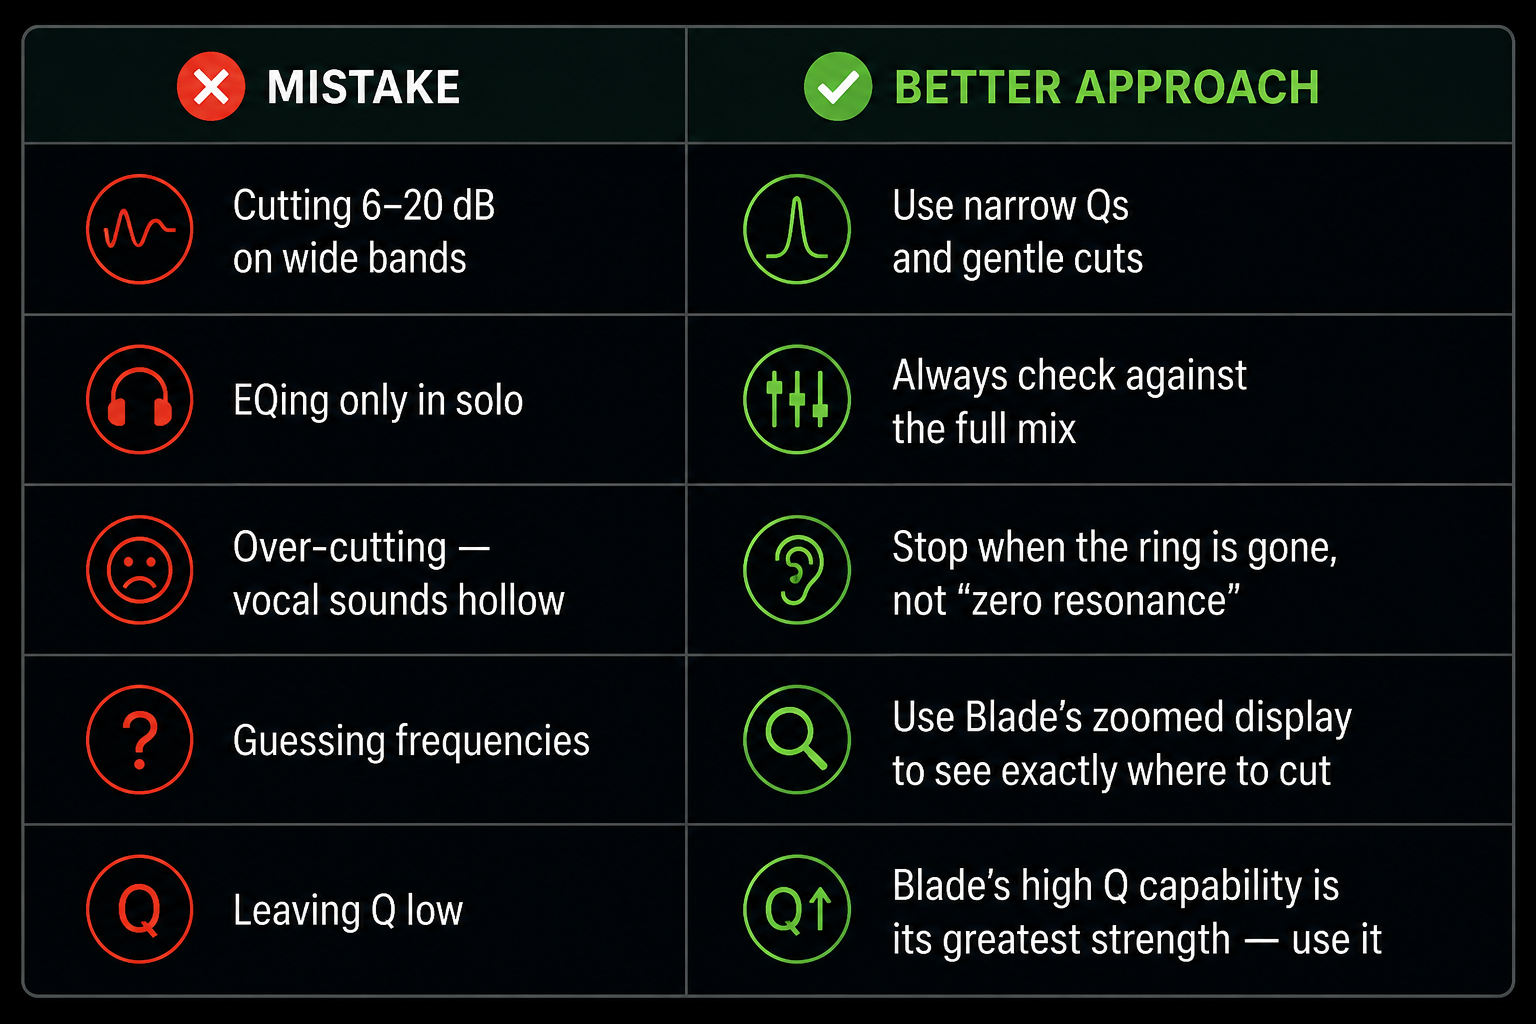
- Set the filter to CUT — typically −2 to −6 dB. Start subtle (−3 dB). You can always cut more later.
- Set Q high — typically 4–12. For very narrow, sharp peaks revealed by Blade's zoom, push Q to 20–50. This is where Blade excels — standard EQs cannot reach this precision.
- Listen and widen/narrow Q until the ringing disappears but the vocal body remains.
- Bypass the filter repeatedly to confirm you are only removing the problem, not gutting the voice.
Typical Starting Points
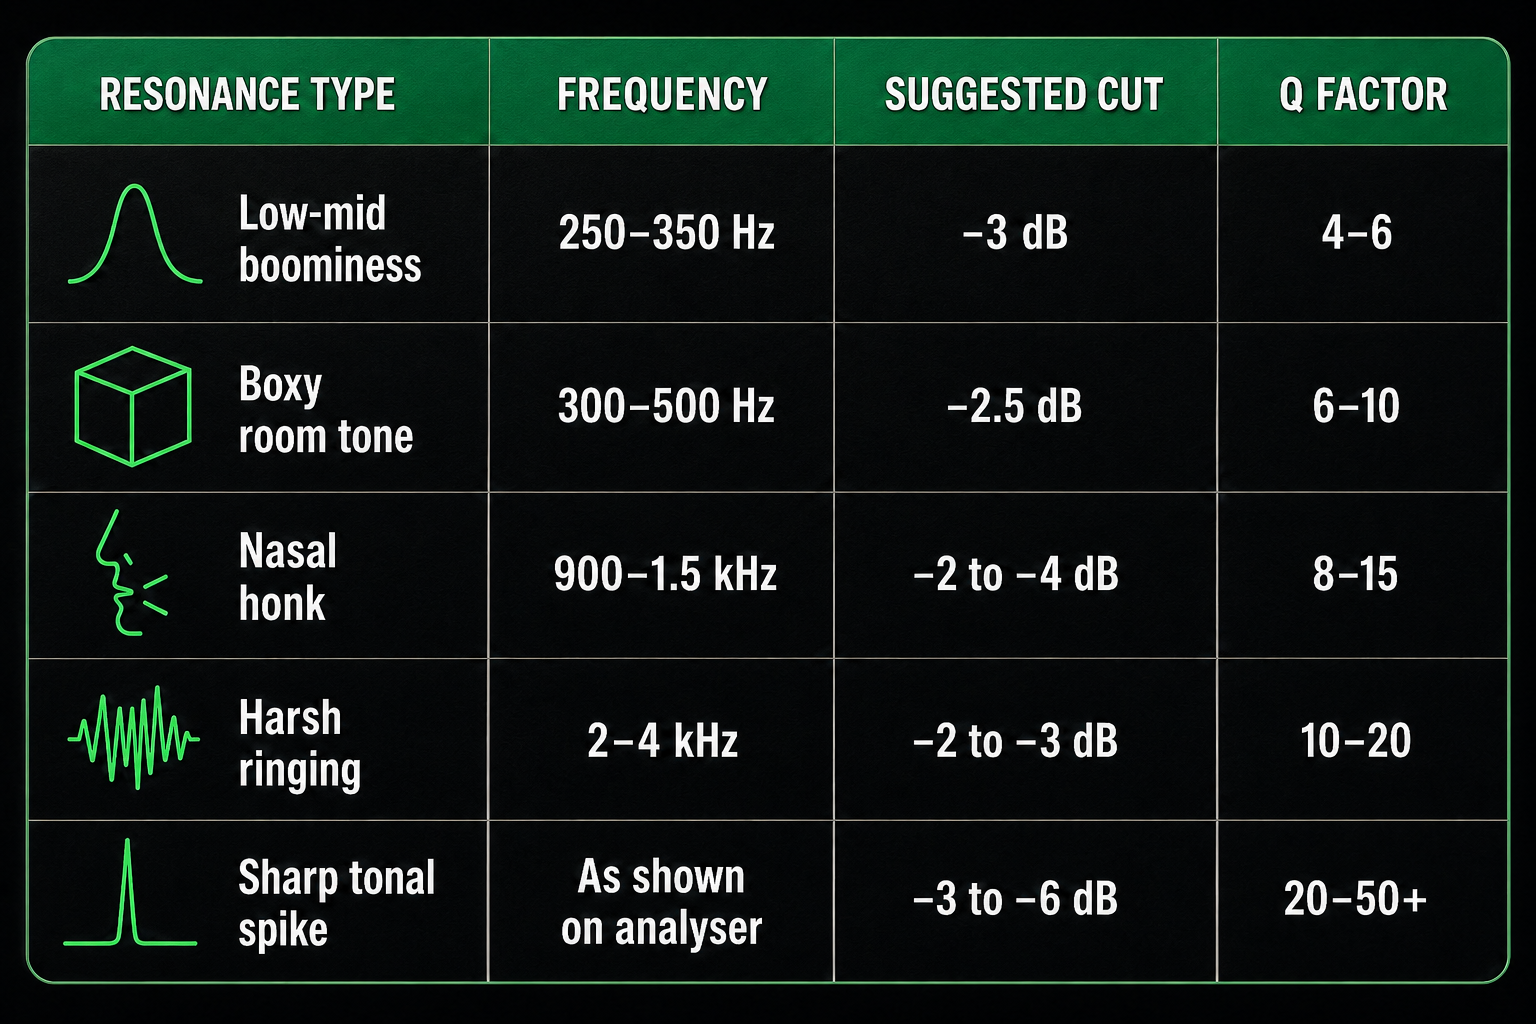
⚠ Rule of thumb: Better three gentle −2 dB narrow cuts than one aggressive −6 dB wide cut. Preserve the vocal, remove only the ring.
Step 4: Complete the Vocal EQ Chain
Once resonances are tamed, balance the overall tone:
- High-Pass Filter — Activate at 60–100 Hz with moderate slope. Removes rumble, plosives, and floor noise without thinning the vocal.
- Low Shelf — If the voice feels thin after cuts, add +1 to +2 dB below 150–200 Hz to restore warmth.
- Presence — A gentle +1–2 dB boost at 3–5 kHz (wide Q) restores intelligibility without reintroducing harshness.
- Air — High shelf at 8–12 kHz, +1–2 dB adds polish and openness.
- Low-Pass — Only if needed to tame extreme hiss above 15–18 kHz.
Step 5: Verify & Refine
- Always check in context — occasionally a resonance sounds worse in solo than in the full mix.
- Compare before/after — bypass Blade entirely to ensure you haven't altered the character beyond repair.
- Multiple resonances? Use up to 3–4 bands the same way: identify → narrow cut → verify. If you need more than 5–6 bands, the problem may be room tone across a broad range rather than discrete resonances.
- Save your preset — if the recording was made in the same room, similar frequencies may appear across multiple tracks.
Common Pitfalls to Avoid
Summary Workflow
- High-pass to clear rumble
- Watch Blade's analyser — zoom in, spot sharp peaks
- Sweep by ear to confirm each resonance
- Apply narrow, gentle cuts — Q 4–50, −2 to −4 dB
- Restore warmth & presence with broad shelves
- A/B constantly — preserve the voice, remove only the ring
CEDAR Blade EQ doesn't just make vocals sound different — it lets you see exactly what needs fixing, then surgically removes only the problem frequencies. The result: clean, natural-sounding vocals where resonances used to live, without ever making the voice sound processed or thin.