




 TECHNICAL REFERENCE
Understanding Hum Interference and Removing It with CEDAR Icons Debuzz
Hum interference is one of the most common and persistent problems in audio production and restoration. This article presents ways to avoid and remove hum from your audio.
What Is Hum Interference?
Hum interference (also known as mains hum, buzz, AC hum, or power-line hum) is a persistent low-frequency tonal noise heard as a steady "buzzing" or "humming" sound in audio recordings, broadcasts, and sound systems. It is one of the most common and persistent problems in audio production and restoration.
- Fundamental frequency: 50 Hz in the UK, Europe, and most of the world; 60 Hz in North America and parts of Asia.
- Harmonics: The hum almost always includes strong multiples — 100 Hz, 150 Hz, 200 Hz, 250 Hz, 300 Hz — which give it a rich, buzzing character rather than a pure tone.
- Auditory effect: A low, steady drone that masks quiet details, makes recordings sound "unprofessional," and is especially noticeable during pauses or quiet passages.
How Hum Interference Is Created?
Hum enters audio signals through several well-understood physical mechanisms:
1. Electromagnetic Induction
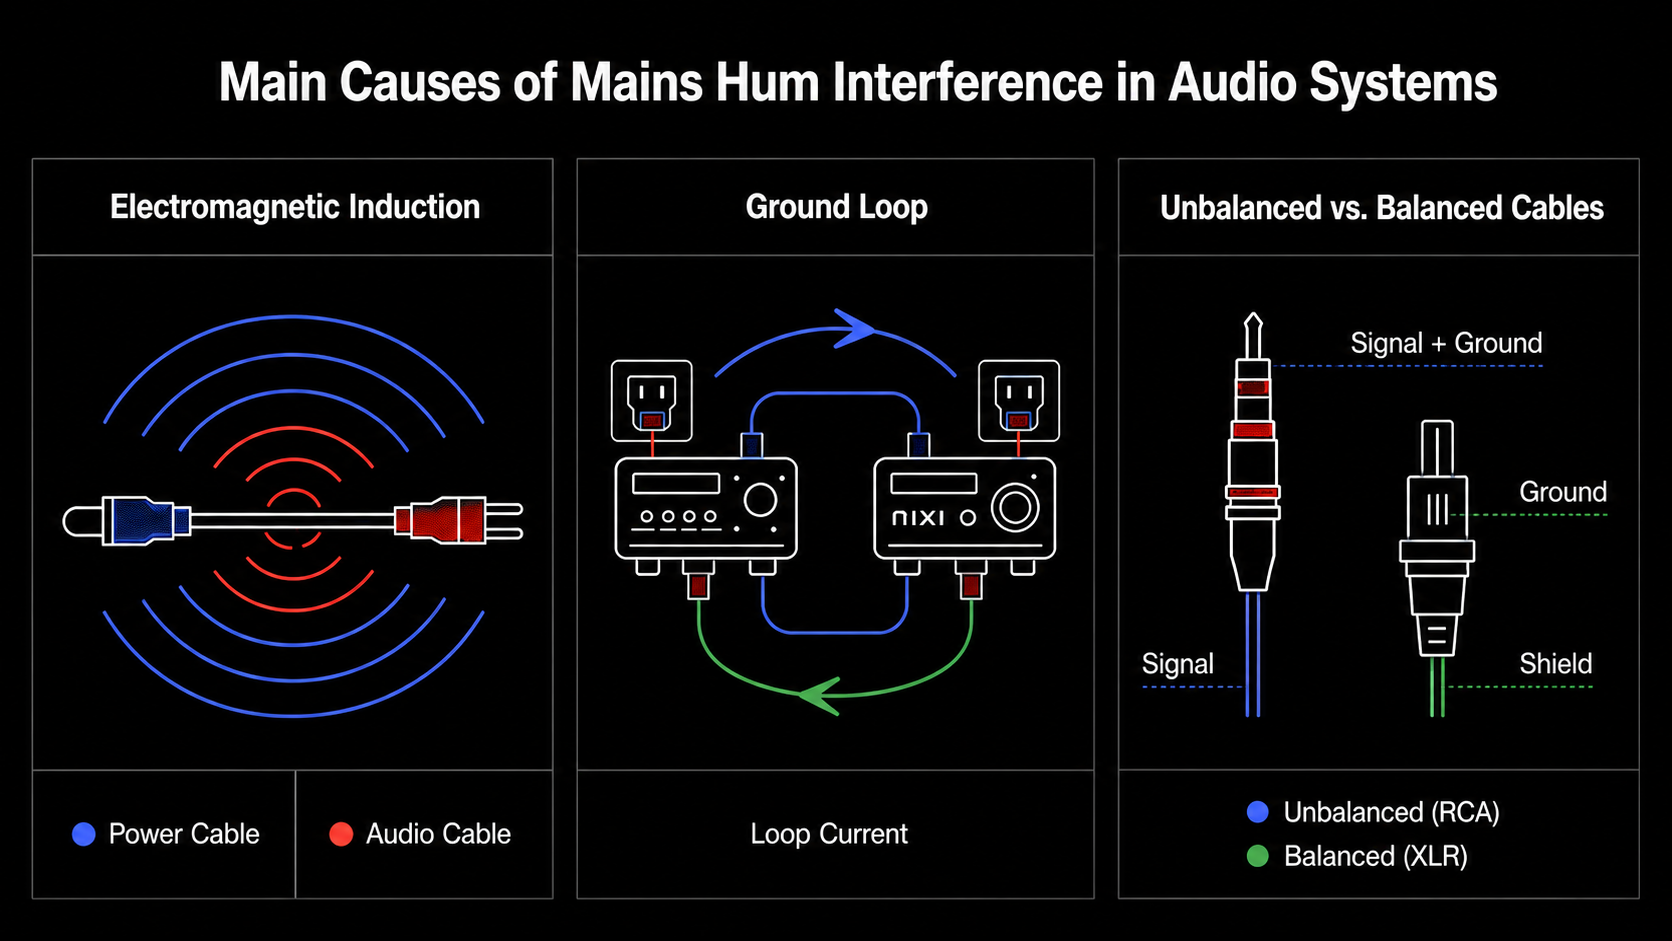
Power cables and transformers radiate alternating magnetic fields at the mains frequency. These fields pass through audio cables, microphone wiring, and circuit traces, and induce small voltages directly into the audio path — exactly as a transformer works, but unintentionally. The closer the audio wiring lies to power cables, the stronger the interference.
Visual concept: Imagine power cables creating an invisible, oscillating magnetic bubble around them. Any conductor (audio wire) passing through that bubble picks up a tiny copy of the 50/60 Hz power signal.
2. Ground Loops — The #1 Cause of Severe Hum
When two or more pieces of audio equipment are plugged into different power outlets, they may see slightly different ground potentials (a fraction of a volt difference between the outlets). This creates a closed loop: the ground wire, the building wiring, and the cable shield all form a continuous loop. The mains magnetic field induces a current to flow around this loop, and that current flows through the cable shield — turning the shield into an antenna that injects hum directly into your audio.
Visual concept: Two devices connected by an audio cable, each grounded to slightly different voltages. The voltage difference pushes a tiny current around the loop formed by cable shield → device A ground → building ground → device B ground → cable shield. This loop current creates the hum voltage you hear.
3. Magnetostriction and Leakage
Inside transformers and power supplies, the iron core expands and contracts twice per AC cycle — a physical effect called magnetostriction — creating mechanical vibration at 100/120 Hz. This can radiate as sound or couple mechanically into microphone bodies and circuit boards. Poorly filtered power supplies also pass residual AC ripple directly into audio circuitry.
4. Other Common Sources
- Unbalanced cables (RCA, 3.5mm, TS) — their shared ground/signal wire makes them far more susceptible than balanced (XLR, TRS) connections
- Electric guitar recordings
- Poorly shielded wiring running parallel to power cables
- Lighting dimmers and SCR-based controls — these introduce sharp edges in the waveform that create rich harmonics, often described as "buzz" rather than pure hum
- Corroded or loose grounding anywhere in the system
Traditional Solutions — and Their Limitations.
Before advanced digital processing, engineers would:
- Re-route cables away from power wiring
- Use balanced connections and hum eliminators
- Lift ground on one device (carefully!)
- Apply notch filters or comb filters at 50/60 Hz and harmonics
The problem with traditional filtering: Notch filters cut everything at that frequency — including wanted audio. A voice or instrument with energy at 100 Hz will be hollowed out, sounding thin, distant, or "phasey." Comb filters create a characteristic metallic, underwater quality. You remove the hum, but you damage the audio.
Introducing CEDAR icons Debuzz
CEDAR Icons Debuzz is an advanced plug-in (VST3 / AU / AAX) that removes hum and buzz without using conventional notch or comb filters. Derived from CEDAR Audio's decades of professional audio restoration technology, it allows you to remove or attenuate the hum— while leaving your wanted audio largely intact.
Key Capabilities
- Removes hum/buzz with fundamentals up to 500 Hz
- Targets all harmonics across the entire audio spectrum
- Tracks wandering tones — if the hum frequency drifts slightly (by up to ~2%), Debuzz follows it automatically
- Preserves audio quality — no hollow sound, no comb-filter artefacts
- Provides a Confidence Meter to verify you've locked onto the correct frequency
How to Use CEDAR icons Debuzz — Step by Step
Step 1 — Insert and Identify the Hum
Insert Debuzz on the affected track or channel. Play a section where the hum is clearly audible.
If you don't know what the fundamental frequency of the hum is, use a third-party spectrum analyser or a spectrogram (like the one used in CEDAR Retouch™) — to identify the fundamental frequency.
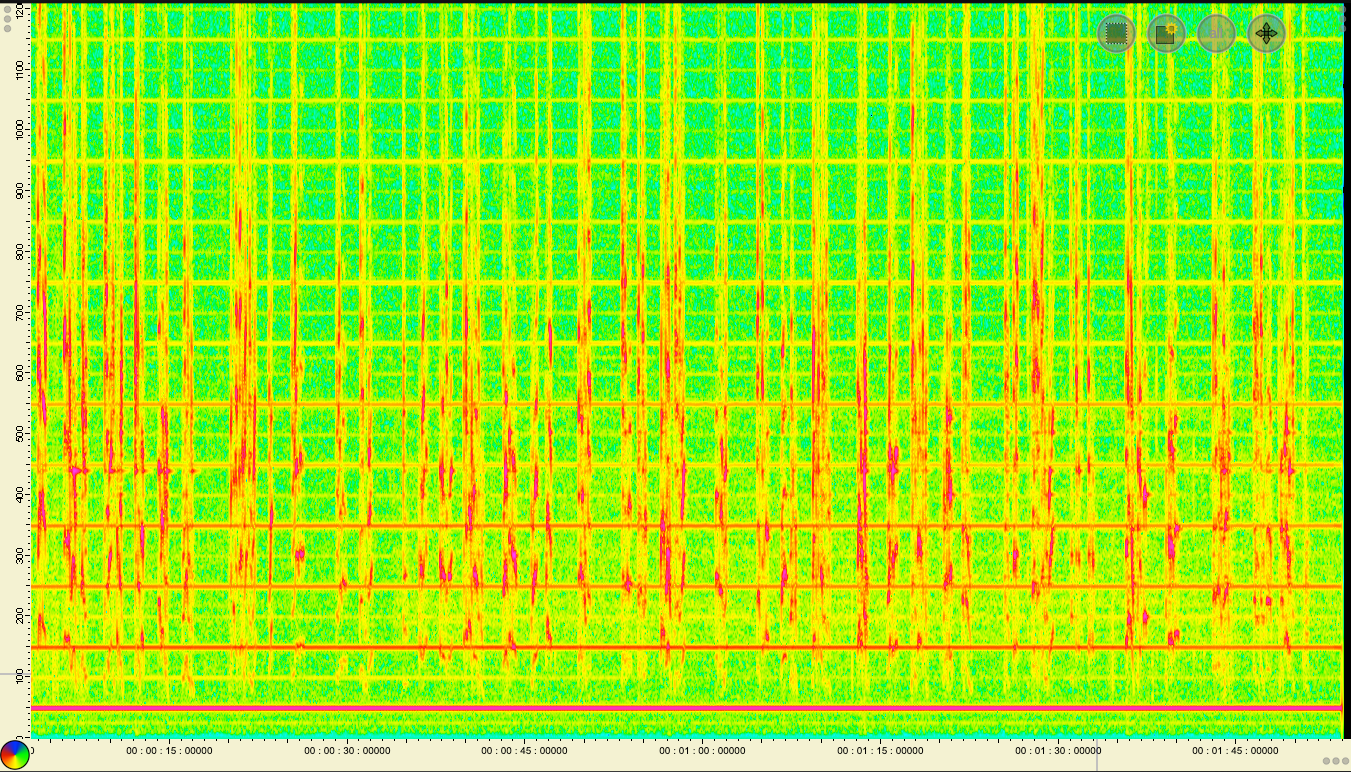
In a spectrogram, you will see evenly spaced horizontal lines across a section or the entire audio around:
- 50 Hz → 100 Hz → 150 Hz → 200 Hz → 250 Hz → 300 Hz ... (UK/Europe)
- 60 Hz → 120 Hz → 180 Hz → 240 Hz → 300 Hz ... (USA/parts of Asia)
The lowest line is the fundamental frequency — set Debuzz's Frequency control to this value.
Step 2 — Set the Fundamental Frequency
- For UK/Europe/most of the world: set to 50 Hz
- For North America: set to 60 Hz
- For lighting buzz, guitar buzz, or other sources, you may need to set it higher.
Step 3 — Adjust the Reduction and Threshold controls
- Reduction: Start with the control set to its maximum reduction value at this point, you should hear the hum is gone or attenuated.
- Threshold: Determines how readily Debuzz distinguishes hum from wanted audio. Higher values process only strong, clear hum; lower values catch more hum but carry slightly more risk of affecting quiet audio. With the Reduction control set to its maximum, slowly bring down the threshold control until you start to hear the hum reappear, then back it off so that the hum is removed. This is the cusp point
Step 4 — Bandwidth Limit: Restricts processing to a frequency range.
Reduce the Bandwidth to the point where you begin to hear the highest buzz harmonics reappear, and then increase it again until the buzz disappears. This will ensure that processing is concentrated in the correct region.
Step 5 — Finally, set the Reduction control to the appropriate level.
This will be the level at which Debuzz removes the problem without degrading the wanted signal.
Step 6 — Fine-Tune and Compare
- Bypass the plug-in repeatedly to A/B the result
- Listen carefully to bass and low-mid — this is where Debuzz works hardest and where any side-effects would appear
- If the audio sounds thinner or weaker after processing, reduce Reduction slightly or raise the reduction
- If you hear buzz or hums reappear and disappear when you play the material, it may be that
- their frequencies are not stationary. In this case, make sure that Tracking switch is on. Debuzz will now track the fundamental within a range of approximately ±2% of the selected frequency.
Conclusion
Hum is a physical problem caused by electromagnetic fields and ground loops. The best solution will always be to fix the wiring and grounding. But when you can't fix the source — in archival recordings, on location, or in post-production — CEDAR Icons Debuzz removes the hum, leaving your audio sounding natural and clean in a way that traditional filters simply cannot match.
Head of Sales
CEDAR Audio Ltd
17 Aug 2026